LFS Editor/Guides/Car Skin Texture
| If you don't know how to apply textures to a car in the Modeller, you can follow this video tutorial about texturing. |
A skin is a special texture designed to cover the paintwork of your vehicle so that other people can create their own custom paint jobs. The idea is to uniquely cover the whole paint surface of the vehicle without any part of the texture being used more than once. As a mod creator you may take on the task of creating a default skin that people can modify to use when driving your mod. Here are a few tips for designing skins.

Things needed
- a skin file located in data\skins folder, with a name like ABC123_NAME.jpg
- a page of type "skin" called ABC123_NAME where ABC123 is the Skin ID of your mod and NAME is a name for the skin texture
- multiple cutouts using that skin page, usually for each view of the car (left, right, front, back, top) - this may vary depending on the shape complexity of the car
- mappings using those cutouts and assigned to the respective triangles of the model
- the skin must be assigned to a car colour in Vehicle Editor - Colours tab
Tips
- A skin must be created as 1024 or 2048 square image. It can be a blank image for start. To load it into LFS it must be saved as a JPG in your data\skins folder, with a name like ABC123_NAME.jpg where ABC123 is the Skin ID of your mod and NAME is a name for the texture (usually DEFAULT for a plain texture). To use a skin in the editor, there must be a page of type "skin" named after the skin file in data\skins.
- The artists who create custom skins prefer everything lined up as well as possible, so try to use the options link with SIDE / link with FRONT / link with BACK / link with TOP for the main mappings, so your mappings have the correct width.
- You can type in the height of the mapping, to make sure front, back, side mappings have the same height (right click on a value to edit it manually). You can also type in the right, front, up values.
- Try to keep the pixels of your mappings fairly square (cutout has a similar aspect ratio to the mapping). The squarer they are, the easier for your skin artists.
- Not *everything* needs to be skinned from a proper direction. E.g. skin artists may be quite happy with a single mapping for a wing mirror, probably from the front, that goes right through the object (so the side and top surfaces are not individually mapped). Smaller mappings don't 'link' with any other mapping.
- Skins on models with complex shapes may have the added complication of overlapped areas. So you should plan this in advance, where you want the MAIN top, front, side, back mappings and allow enough space for the overlapped areas to be mapped separately. You may wish to follow the general idea of one of our default skins, and change it to suit your needs.
Generating a skin template
Once you have all mappings in place, there is a function to generate a skin template for your car. It takes the correct size screenshot of all assigned mappings for the skin texture, and copies that to the clipboard so you can paste it into your work-in-progress skin in your 2D graphics software.
Go to 'page' mode, click the skin texture page and you will see multiple buttons for exporting a skin texture:
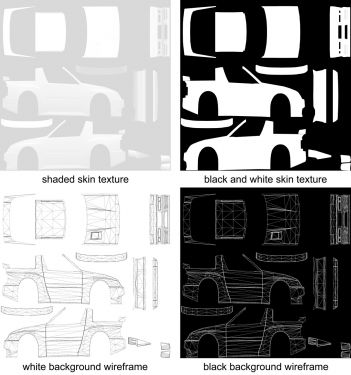
- create shaded skin texture - this texture is cut out exactly around the outer edges of the model, which may result in unwanted visible seams when the skin is applied on the car.
- black and white skin texture - this includes some overlaps to eliminate seams around the edges of the mappings.
- white background wireframe
- black background wireframe
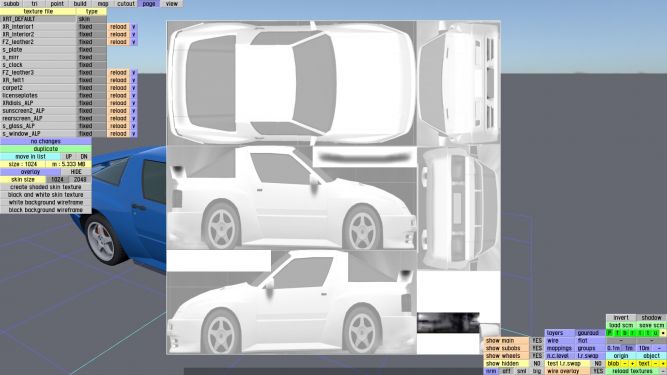
Skin texture page options in the LFS editor. Notice that it is of type "skin" in the list of pages. On the left side, there are buttons for exporting a skin texture or a wireframe mesh to the clipboard.
Automatic skin texture export features

