Difference between revisions of "Skin Tutorial"
m (→How to use a skin in LFS: Added info about 1024/2048 skins) |
|||
| (43 intermediate revisions by 8 users not shown) | |||
| Line 1: | Line 1: | ||
| − | <!-- This section was originally written by XCNuse --> | + | <!-- "This section was originally written by XCNuse." -- I mean great, but this is a publicly edited wiki, no need to keep these credits type mentions since articles have changed and expanded a lot. - Mandula --> |
| − | + | LFS allows you to make your own skins and of course use them on your cars. You can also create helmet skins which others can see while you drive. Further below is a quick explanation of how to make and upload your own skins. | |
| − | + | == Using a skin in LFS == | |
| + | First, here's how to use a skin of your own (or maybe someone gave you a skin to use) on your own car. | ||
| + | {{steps | ||
| + | |First, copy the skin (in JPG format) into your {{folder|LFS|data|skins}} folder. Make sure the skin has valid dimensions (512*512 or 1024*1024 or 2048*2048), and also make sure it has a proper file name with the car tag prefix at the beginning (e.g. CAR_skinname.jpg, for example XRT_niceskin.jpg). Then follow the next steps to apply the skin to your car. | ||
| + | | In the Garage/Pits screen, create a new Color selection by clicking on {{Button|New colours}} - this will redirect you to the skin selection screen | ||
| + | <p>[[image:newskin1me9.jpg|512px|none]]</p> | ||
| + | | Choose the skin from the list (if your skin is not visible, make sure it is in your {{folder|LFS|data|skins}} folder!) | ||
| + | <p>[[image:newskin3cn1.jpg|512px|none]]</p> | ||
| + | | The skin you chose should now be applied to your car (you can check if on the Colours tab your Skin File Name is visible at the bottom) | ||
| + | <p>[[image:newskin4pq0.jpg|512px|none]]</p> | ||
| + | }} | ||
| − | + | At this point, your skin is visible on track. For others, your skin is visible only if this specific skin (e.g. XRT_niceskin.jpg) is uploaded to LFS World. See the section below for more info. | |
| − | |||
| − | + | == How can other people see your skin in LFS == | |
| − | + | If you have a self made skin on your car, then of course you want other people to see your skin when you meet them online. | |
| − | |||
| − | |||
| − | |||
| − | |||
| − | + | This is achieved by uploading your skin to LFS World. When that is done, people you meet online will automatically be able to download your skin from LFS World. | |
| − | |||
| − | '''Demo Users:''' Only S2 licensed users have the ability to | + | '''Demo Users:''' By default you cannot upload skins to [[LFS World]]. Only S1/S2/S3 licensed users have the ability to do so. You can however purchase skin upload slots via [https://www.lfs.net/account/skins the car skins section of LFS.net]. |
| − | + | The only other way to make your skin visible to others, is if you contact them privately, and send them the skin file manually. Requesting your skin to be uploaded on the LFSForum is not tolerated. | |
| − | + | '''S1/S2/S3 Licensed Users:''' If you are logged in on LFS.net, go to [https://www.lfs.net/account/skins the car skins section] and drag and drop your skins to make them available for download while racing online. Skins uploaded to LFS World should be in 1024*1024 resolution, but you can also upload a skin of 2048*2048 resolution). You can find more requirements and regulations on the [https://www.lfs.net/account/skins/upload skins information] page. | |
| − | <!-- Section originally written by Master Skinnerz --> | + | Lastly, editing an existing skin without the original creators' permission is not only rude, but is classed as stealing and copyright infringement. Also having nudity, pornographic, racist or any other extremely offensive content in your skin is not allowed. |
| + | <!-- Section originally written by Master Skinnerz and updated by Silverracer, later updated by Mandula (who wonders if, on a publicly editable wiki, there is a place for everyone to sign sections...) --> | ||
== How do I make a skin? == | == How do I make a skin? == | ||
| − | === Good | + | === Good to know === |
Let's get right down to the facts so we can move on to actually making and using custom skins. | Let's get right down to the facts so we can move on to actually making and using custom skins. | ||
* Each car in LFS is a 3D model with a texture "wrapped" around it. In the case of LFS that texture is a JPG file, this image format was developed for use on the Internet and is therefore very common. LFS skins are JPG files, nothing any more complicated than that. | * Each car in LFS is a 3D model with a texture "wrapped" around it. In the case of LFS that texture is a JPG file, this image format was developed for use on the Internet and is therefore very common. LFS skins are JPG files, nothing any more complicated than that. | ||
| − | * Every decent (and many poor) graphics and paint programs support the JPG format. This makes skinning very easy in LFS because anyone can have a go. JPG images are easy to create and edit, and they use compression to reduce file size, helping to improve performance by minimising the load on PC | + | * Every decent (and many poor) graphics and paint programs support the JPG format. This makes skinning very easy in LFS because anyone can have a go. JPG images are easy to create and edit, and they use compression to reduce file size, helping to improve performance by minimising the load on PC hardware resources. |
| − | * LFS contains default skins which can be "painted over" in your favourite paint or graphics program, and saved as skins in JPG format for use in LFS. That's as simple as skinning really can be. You can find the default skins in your LFS | + | * LFS contains default skins which can be "painted over" in your favourite paint or graphics program, and saved as skins in JPG format for use in LFS. That's as simple as skinning really can be. You can find the default skins in your {{folder|LFS|data|skins}} folder. Look for the plain white skins with no design on them. |
| − | * LFS skins have a special naming prefix for each car, you will notice this prefix in the skin name, for example: FZR_DEFAULT.jpg. The FZR_ prefix must be used for FZR cars if you want the game and LFS World to handle the textures (skins) properly. Apart from this technical reason, it makes good sense to have everyone using the same naming convention for skins. All cars each have their own 3-letter filename prefix followed by an underscore, check your skins folder and you will see how it works. | + | * You can also use Skin Templates, which are blank skin files, with the wireframe visible. This wireframe helps you a lot, when aligning your design with the car. You can generate Skin Templates by clicking the {{button|Generate Skin Template|light}} button on the Garage screen, Colours tab. After choosing a variant, the template is copied to your clipboard, and ready to be pasted in a graphics software as a base to aid design. See the four types of skin templates below. |
| + | * LFS skins have a special naming prefix for each car, you will notice this prefix in the skin name, for example: FZR_DEFAULT.jpg. The FZR_ prefix must be used for FZR cars if you want the game and LFS World to handle the textures (skins) properly. Apart from this technical reason, it makes good sense to have everyone using the same naming convention for skins. All default cars each have their own 3-letter filename prefix followed by an underscore, check your skins folder and you will see how it works. Vehicle mods use a 6-character skin ID, which can be seen on the mod's page on lfs.net ([https://www.lfs.net/files/vehmods/B7B8DC example]) or in-game, in pit menu within the 'colours' tab. | ||
| − | === Basic | + | Here are some examples for skin templates for [[Formula BMW FB02]], generated from LFS: |
| + | |||
| + | <gallery> | ||
| + | St1 shaded skin texture.jpg|Shaded skin texture | ||
| + | St2 blackwhite skin texture.jpg|Black and white skin texture | ||
| + | St3_white_bkg_wireframe.jpg|White background wireframe | ||
| + | St4 black bkg wireframe.jpg|Black background wireframe | ||
| + | </gallery> | ||
| + | |||
| + | === Basic method of making a skin === | ||
Ok this is really basic, but if you are new to skinning this will get you started: | Ok this is really basic, but if you are new to skinning this will get you started: | ||
| − | + | {{steps | |
| − | + | | Launch your graphics or paint program (recommended: Paint Shop Pro, Photoshop. Not recommended: Windows Paint). | |
| − | + | | Go to file/ open, browse to your {{folder|LFS|data|skins}} folder and choose a default skin (plain white) for the car you wish to paint. Click Ok.<br>(Alternatively, you can use the Skin Template generated from LFS (see the previous section). Paste the template in your graphics software.) | |
| − | + | | Using the paint and effects tools provided with your software you can paint the skin and create a design for your car. You may also cut and paste other images on to your skin. Sponsor logos are popular additions, as are racing stripes and numbers, your country's flag and things like that. Don't stop until you are very satisfied with the quality of your work. | |
| − | Making sure that you are saving to your LFS | + | | Go to file/ save as, and make sure that the file type selected is JPG. Name your skin using the three-letter prefix, include the underscore. Don't use a common name like XFG_HONDA, be more unique. Don't use special characters in your filenames, keep it simple. |
| + | | Making sure that you are saving to your {{folder|LFS|data|skins}} folder, click Ok to save your JPG file. | ||
| + | | LFS version 0.7B added a very useful {{button|Skin Viewer|light}} to the Garage screen, with which you can preview your skin in-game, to make sure it lines up correctly and looks exactly how you wanted it to look. You can rotate your car to look at it in any direction. | ||
| + | }} | ||
| − | There. You just made your first skin! I hope you put more time and effort into the next one, below are some tools and information to help you do your best. Please check our other tutorial topics for more advanced techniques and considerations. | + | There. You just made your first skin! I hope you put more time and effort into the next one, below are some tools and information to help you do your best. Please check our other tutorial topics for more advanced techniques and considerations. Note, others will only see your creation online if you upload it to LFS World (LFS.net) - see [[Skin_Tutorial#How_can_other_people_see_your_skin_in_LFS|the related section]] for more info. |
| − | == How to upload skins to LFS | + | == How to upload skins to LFS == |
| − | * Go to www. | + | * Go to [http://www.lfs.net www.lfs.net] and log in using your username and password |
| − | * | + | * Click your username in the top bar and select [https://www.lfs.net/account/skins/upload "Car skins"] |
| − | * Click | + | * Click "Upload skins / skins information" button |
| − | * | + | * Drag and drop, or find your jpeg image of the skin (in no more than 2048 x 2048) |
* Click upload skin | * Click upload skin | ||
* Go online and enjoy everyone seeing your skin | * Go online and enjoy everyone seeing your skin | ||
| + | |||
| + | == How to get additional skin-upload slots == | ||
| + | |||
| + | By default, S1 users get 25 skin upload slots, S2 users get 50 and S3 users get 75. | ||
| + | |||
| + | You can purchase additional slots via the [https://www.lfs.net/account/skins/upload Upload skins / skins information] page. In the "INCREASE AVAILABLE SLOTS" section, click on the "Add 50 extra slots" button found on the page. You can purchase 50 slots for a charge of £1. | ||
| + | |||
| + | Note: Even demo users can also purchase additional skin slots. | ||
== Useful links == | == Useful links == | ||
| − | * [http://www.adobe.com/products/photoshop/ Adobe Photoshop] | + | * [http://www.adobe.com/products/photoshop/ Adobe Photoshop] |
| − | * [http://www.adobe.com/products/fireworks/ Adobe Fireworks] | + | * [http://www.adobe.com/products/fireworks/ Adobe Fireworks] |
| − | * [http://www.zdnet.de/downloads/programs/s/l/de0DSL-wc.html Corel (Jasc) Paint Shop Pro] | + | * [http://www.zdnet.de/downloads/programs/s/l/de0DSL-wc.html Corel (Jasc) Paint Shop Pro] |
| − | * [http://www.gimp.org/ The GIMP ( | + | * [http://www.gimp.org/ The GIMP (free software)] |
| − | * [http://www.inkscape.org/ Inkscape] | + | * [http://www.pixlr.com/ Pixlr (a free photoshop program online)] |
| − | * [http://www.cameleon-labs.com/ ObjectPainter] | + | * [http://www.inkscape.org/ Inkscape] |
| − | * [http://www.getpaint.net/index.html Paint.net] | + | * [http://www.cameleon-labs.com/ ObjectPainter] |
| − | * [http://www.snapfiles.com/get/photofiltre.html PhotoFiltre] | + | * [http://www.getpaint.net/index.html Paint.net] |
| − | * [http://www.xara.com/ Xara Xtreme] | + | * [http://www.snapfiles.com/get/photofiltre.html PhotoFiltre] |
| − | * [http://www.brandsoftheworld.com/ brandsoftheworld (sponsor | + | * [http://www.xara.com/ Xara Xtreme] |
| − | * [http://www. | + | * [http://www.brandsoftheworld.com/ brandsoftheworld (sponsor logos for your skins)] |
| + | * [http://www.barkingpig.org/msz/ Master Skinnerz (skinning resources like templates)] | ||
| + | * [https://www.lfs.net/forum/thread/64975-The-Stretching-of-Skins LFS Forums - Stretching guides for default LFS cars] | ||
| + | |||
Uploading Services for LFS Skins<br /> | Uploading Services for LFS Skins<br /> | ||
| − | * [http://www.lfsworld.net/ LFS World] | + | * [https://www.lfs.net/account/skins/upload LFS.net: Car Skins] |
| + | * [http://www.lfsworld.net/ LFS World] | ||
{{Guides}} | {{Guides}} | ||
| + | [[Category:Guides]] | ||
| + | [[Category:Digital art]] | ||
| + | [[Category:Customisation]] | ||
<!-- links to other languages --> | <!-- links to other languages --> | ||
[[de:Skin Tutorial]] | [[de:Skin Tutorial]] | ||
| + | [[ja:スキン作成_チュートリアル]] | ||
| + | [[hu:Festési útmutató]] | ||
Latest revision as of 11:07, 7 September 2024
LFS allows you to make your own skins and of course use them on your cars. You can also create helmet skins which others can see while you drive. Further below is a quick explanation of how to make and upload your own skins.
Using a skin in LFS
First, here's how to use a skin of your own (or maybe someone gave you a skin to use) on your own car.
- 1First, copy the skin (in JPG format) into your LFS\data\skins folder. Make sure the skin has valid dimensions (512*512 or 1024*1024 or 2048*2048), and also make sure it has a proper file name with the car tag prefix at the beginning (e.g. CAR_skinname.jpg, for example XRT_niceskin.jpg). Then follow the next steps to apply the skin to your car.
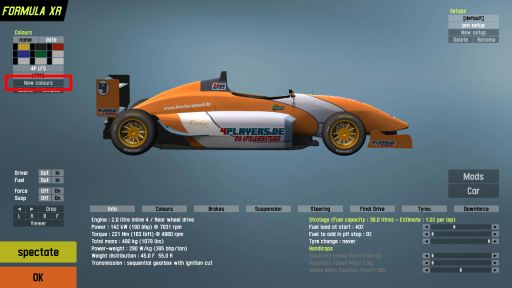
- 2 In the Garage/Pits screen, create a new Color selection by clicking on New colours - this will redirect you to the skin selection screen
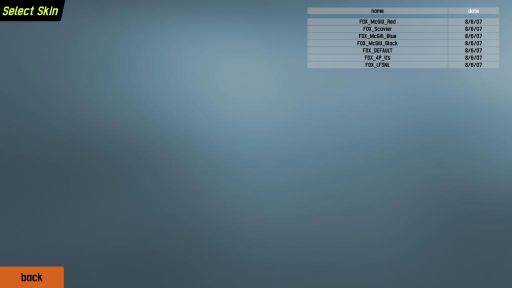
- 3 Choose the skin from the list (if your skin is not visible, make sure it is in your LFS\data\skins folder!)
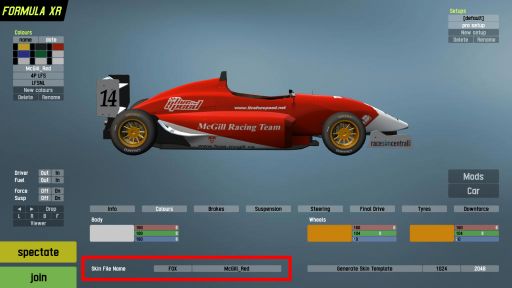
- 4 The skin you chose should now be applied to your car (you can check if on the Colours tab your Skin File Name is visible at the bottom)
At this point, your skin is visible on track. For others, your skin is visible only if this specific skin (e.g. XRT_niceskin.jpg) is uploaded to LFS World. See the section below for more info.
How can other people see your skin in LFS
If you have a self made skin on your car, then of course you want other people to see your skin when you meet them online.
This is achieved by uploading your skin to LFS World. When that is done, people you meet online will automatically be able to download your skin from LFS World.
Demo Users: By default you cannot upload skins to LFS World. Only S1/S2/S3 licensed users have the ability to do so. You can however purchase skin upload slots via the car skins section of LFS.net.
The only other way to make your skin visible to others, is if you contact them privately, and send them the skin file manually. Requesting your skin to be uploaded on the LFSForum is not tolerated.
S1/S2/S3 Licensed Users: If you are logged in on LFS.net, go to the car skins section and drag and drop your skins to make them available for download while racing online. Skins uploaded to LFS World should be in 1024*1024 resolution, but you can also upload a skin of 2048*2048 resolution). You can find more requirements and regulations on the skins information page.
Lastly, editing an existing skin without the original creators' permission is not only rude, but is classed as stealing and copyright infringement. Also having nudity, pornographic, racist or any other extremely offensive content in your skin is not allowed.
How do I make a skin?
Good to know
Let's get right down to the facts so we can move on to actually making and using custom skins.
- Each car in LFS is a 3D model with a texture "wrapped" around it. In the case of LFS that texture is a JPG file, this image format was developed for use on the Internet and is therefore very common. LFS skins are JPG files, nothing any more complicated than that.
- Every decent (and many poor) graphics and paint programs support the JPG format. This makes skinning very easy in LFS because anyone can have a go. JPG images are easy to create and edit, and they use compression to reduce file size, helping to improve performance by minimising the load on PC hardware resources.
- LFS contains default skins which can be "painted over" in your favourite paint or graphics program, and saved as skins in JPG format for use in LFS. That's as simple as skinning really can be. You can find the default skins in your LFS\data\skins folder. Look for the plain white skins with no design on them.
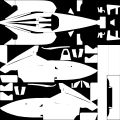
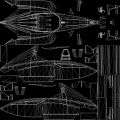
- You can also use Skin Templates, which are blank skin files, with the wireframe visible. This wireframe helps you a lot, when aligning your design with the car. You can generate Skin Templates by clicking the Generate Skin Template button on the Garage screen, Colours tab. After choosing a variant, the template is copied to your clipboard, and ready to be pasted in a graphics software as a base to aid design. See the four types of skin templates below.
- LFS skins have a special naming prefix for each car, you will notice this prefix in the skin name, for example: FZR_DEFAULT.jpg. The FZR_ prefix must be used for FZR cars if you want the game and LFS World to handle the textures (skins) properly. Apart from this technical reason, it makes good sense to have everyone using the same naming convention for skins. All default cars each have their own 3-letter filename prefix followed by an underscore, check your skins folder and you will see how it works. Vehicle mods use a 6-character skin ID, which can be seen on the mod's page on lfs.net (example) or in-game, in pit menu within the 'colours' tab.
Here are some examples for skin templates for Formula BMW FB02, generated from LFS:
Basic method of making a skin
Ok this is really basic, but if you are new to skinning this will get you started:
- 1 Launch your graphics or paint program (recommended: Paint Shop Pro, Photoshop. Not recommended: Windows Paint).
- 2 Go to file/ open, browse to your LFS\data\skins folder and choose a default skin (plain white) for the car you wish to paint. Click Ok.
(Alternatively, you can use the Skin Template generated from LFS (see the previous section). Paste the template in your graphics software.) - 3 Using the paint and effects tools provided with your software you can paint the skin and create a design for your car. You may also cut and paste other images on to your skin. Sponsor logos are popular additions, as are racing stripes and numbers, your country's flag and things like that. Don't stop until you are very satisfied with the quality of your work.
- 4 Go to file/ save as, and make sure that the file type selected is JPG. Name your skin using the three-letter prefix, include the underscore. Don't use a common name like XFG_HONDA, be more unique. Don't use special characters in your filenames, keep it simple.
- 5 Making sure that you are saving to your LFS\data\skins folder, click Ok to save your JPG file.
- 6 LFS version 0.7B added a very useful Skin Viewer to the Garage screen, with which you can preview your skin in-game, to make sure it lines up correctly and looks exactly how you wanted it to look. You can rotate your car to look at it in any direction.
There. You just made your first skin! I hope you put more time and effort into the next one, below are some tools and information to help you do your best. Please check our other tutorial topics for more advanced techniques and considerations. Note, others will only see your creation online if you upload it to LFS World (LFS.net) - see the related section for more info.
How to upload skins to LFS
- Go to www.lfs.net and log in using your username and password
- Click your username in the top bar and select "Car skins"
- Click "Upload skins / skins information" button
- Drag and drop, or find your jpeg image of the skin (in no more than 2048 x 2048)
- Click upload skin
- Go online and enjoy everyone seeing your skin
How to get additional skin-upload slots
By default, S1 users get 25 skin upload slots, S2 users get 50 and S3 users get 75.
You can purchase additional slots via the Upload skins / skins information page. In the "INCREASE AVAILABLE SLOTS" section, click on the "Add 50 extra slots" button found on the page. You can purchase 50 slots for a charge of £1.
Note: Even demo users can also purchase additional skin slots.
Useful links
- Adobe Photoshop
- Adobe Fireworks
- Corel (Jasc) Paint Shop Pro
- The GIMP (free software)
- Pixlr (a free photoshop program online)
- Inkscape
- ObjectPainter
- Paint.net
- PhotoFiltre
- Xara Xtreme
- brandsoftheworld (sponsor logos for your skins)
- Master Skinnerz (skinning resources like templates)
- LFS Forums - Stretching guides for default LFS cars
Uploading Services for LFS Skins
