Difference between revisions of "Basic Setup Guide"
(→Brakes: +note that you can change bias live) |
|||
| (18 intermediate revisions by 2 users not shown) | |||
| Line 1: | Line 1: | ||
| − | [[image:Moby6.jpg|Robert Bjorkman in his Formula Renault]] | + | [[image:Setup01.jpg|thumb]] |
| + | [[image:Moby6.jpg|500px|Robert Bjorkman in his Formula Renault]] | ||
''By Robert "Moby" Bjorkman'' | ''By Robert "Moby" Bjorkman'' | ||
| − | [[ | + | The problems most people have is to adjust their present setup to something that suits their driving style. If you have a set that you feel is fast, but just don’t know how to tune it to make it even better. Welcome to the introduction to setups. This guide will help you understand the basics of setup construction and setup development. To dive even deeper in the topic, see article [[Advanced Setup Guide]]. |
| − | + | For something visual, check out Chris Haye's "Sim Racing Setup Guide" playlist on YouTube, consisting of 13 videos detailing the various aspects of car setup. He also created a helpful, printable "cheatsheet" PDF with quick tips to adjust setups: https://drive.google.com/file/d/1-wnbyqBTJDySzDYU2VmHLfrU5MMihSUs/view. | |
== Basics == | == Basics == | ||
| Line 115: | Line 116: | ||
* '''Open diff''' allows the driven wheels to travel at different lengths. This however means that when one wheel loses grip it will keep spinning until power is released. Not suitable for racing. | * '''Open diff''' allows the driven wheels to travel at different lengths. This however means that when one wheel loses grip it will keep spinning until power is released. Not suitable for racing. | ||
| − | * '''Clutch pack LSD''' is somewhere in between the two previous as it allows the wheels to go different lengths but still apply some lock. This often comes with the coast/power being adjustable. Meaning you can control how much lock you want while being off the throttle(coast) or on the throttle(power). | + | * '''Clutch pack LSD''' is somewhere in between the two previous as it allows the wheels to go different lengths but still apply some lock. This often comes with the coast/power being adjustable. Meaning you can control how much lock you want while being off the throttle (coast) or on the throttle (power). |
* '''Viscous LSD''' is like the clutchpack but being speed sensitive. If one wheel spins faster then the other it tries to transfer power to the other wheel, and the faster the first wheel is spinning the more power is transferred to the other. | * '''Viscous LSD''' is like the clutchpack but being speed sensitive. If one wheel spins faster then the other it tries to transfer power to the other wheel, and the faster the first wheel is spinning the more power is transferred to the other. | ||
| Line 124: | Line 125: | ||
Brakes are what stops the car. The amount of pressure applied to the brake discs can be set to different levels. This is mostly done by trial and error. When you apply max force you want the wheels only to start locking right before you turn into the corner. | Brakes are what stops the car. The amount of pressure applied to the brake discs can be set to different levels. This is mostly done by trial and error. When you apply max force you want the wheels only to start locking right before you turn into the corner. | ||
| − | Brake balance can also be changed to suit different conditions. Brake balance adjusts the amount of pressure that goes to the front brakes and rear brakes. An optimal value would be 50/50 but since weight is being transferred to the front end of the car, the rear end gets less mass and therefore gets easier to lock the rear wheels. A good value is therefore around 60% front and 40% rear. If you're locking up the rear-end while braking you need more brake balance to the front. Front and rear should lock up at the same time, then you have the optimal setting. | + | Brake balance can also be changed to suit different conditions. Brake balance adjusts the amount of pressure that goes to the front brakes and rear brakes. An optimal value would be 50/50 but since weight is being transferred to the front end of the car, the rear end gets less mass and therefore gets easier to lock the rear wheels. A good value is therefore around 60% front and 40% rear. If you're locking up the rear-end while braking you need more brake balance to the front. Front and rear should lock up at the same time, then you have the optimal setting. |
| + | |||
| + | With some cars, you can adjust brake balance on-the-fly (while driving), using the {{key press|F11}} Live Settings panel (for example on {{car link|FOX}} or {{car link|XRR}}). | ||
=== Aerodynamics === | === Aerodynamics === | ||
| Line 148: | Line 151: | ||
===== Steps ===== | ===== Steps ===== | ||
| − | + | {{steps | |
| − | + | | Prepare. When out on the first lap I always turn on the tire temperature screen ({{key press|F9}}). Here you can see the different temps of the tires. Blue means they are cold. Now always allow the first lap to heat up the tires, any feedback you get from cold tires is useless. Green means they are coming into optimum range. Red means they are getting too hot and black means you have a puncture. | |
| − | + | | Test properly. Now you should be on your second lap. Tires should show green. After the first lap you should have a rough feel for the car. Testing properly means you run at race tempo. Going slower will not result in correct tire data or balance, going faster means you will end up in a wall. During the second lap you make mental notes of each corner. Noting balance, brakes and revs through the corners. | |
| − | + | | Data handling. Coming in on third lap you have two choices. | |
| − | + | <p>{{steps | |
| + | |Go on to drive until you have mental notes of all corners. | ||
| + | |Stop, check temperatures and make notes of them. Correct camber according to (1.2.3). A constant eye on tires and temp. are a must during all testing, you should always make sure you have optimum camber. Doing a qualification setup can mean running more camber than usual.}}</p> | ||
| + | }} | ||
===== Analysing ===== | ===== Analysing ===== | ||
| Line 158: | Line 164: | ||
thing at a time, mixing things will often result in over doing it and not knowing what did what. | thing at a time, mixing things will often result in over doing it and not knowing what did what. | ||
| − | Go | + | Go through steps 1, 2, 3 again. Change one thing and repeat. Now what to tune first. I have here a list of what I focus |
| − | on. I usually go | + | on. I usually go through the list pretty quickly the first time, to get a good base to work from. Keep in my mind that I’m |
constantly changing the camber during these changes. | constantly changing the camber during these changes. | ||
| Line 170: | Line 176: | ||
# Tire pressure | # Tire pressure | ||
| − | Most changes will result in | + | Most changes will result in affecting other things on your setup, keep in mind you may have to go through the list a |
couple of times. Aerodynamics has such large influence on top speed and cornering speed that you should try | couple of times. Aerodynamics has such large influence on top speed and cornering speed that you should try | ||
and adjust the gearbox to suit the different aero settings you are testing. Making sets are time consuming. In the | and adjust the gearbox to suit the different aero settings you are testing. Making sets are time consuming. In the | ||
| Line 188: | Line 194: | ||
Then we have the other setting its called controller wheel turns x degrees. How it works is better explained | Then we have the other setting its called controller wheel turns x degrees. How it works is better explained | ||
| − | elsewhere but the important thing is that you have a value on top of the slider. That is the recommended value for | + | elsewhere, but the important thing is that you have a value on top of the slider. That is the recommended value for |
| − | you to use. | + | you to use. I feel much more precise if I set the value to around 30-35% of the recommended value in |
| − | + | controller wheel turns in steering menu. However, this might not have the desired effect on all wheels. You should | |
| − | controller wheel turns in steering menu. However this might not have the desired effect on all wheels. You should | + | test out a value for both these settings to suit you. This might be required for all sets you get but after a while you |
| − | test out a value for both these settings to suit you. This might be required for all sets you get but after | ||
will know pretty quickly what do which each set. | will know pretty quickly what do which each set. | ||
| Line 214: | Line 219: | ||
basics of the new set. | basics of the new set. | ||
| − | ===== Faster vs | + | ===== Faster vs. safer ===== |
| − | Going faster means you are pushing towards what physics allow. When you get closer to that limit it will mean | + | Going faster means you are pushing towards what physics allow. When you get closer to that limit it will mean losing some of your control. When you are the fastest in the world it means you’re the one that is closest to the limit of the car without losing control. At one point in your set development, you will get to the point when you cannot make the car go faster in a straight line, because then you lose in the corners. When you have a decent balance in the car, you try and see if you can go further without losing control. This is done in small steps. |
| − | losing | + | |
| − | limit of the car without losing | + | {{steps |
| − | cannot make the car go faster in a straight line because then you lose in the corners. When you have a decent | + | | Reduce downforce, 2 notches at front and 1 at rear. If still good, then move on. |
| − | balance in the car you try and see if you can go further without losing | + | | Higher tire pressure, when its too high you will lose traction. |
| − | + | | Optimize gearing | |
| − | + | | Reduce toe | |
| − | + | }} | |
| − | + | ||
Repeat the cycle until you feel you can go no further without losing the car. Still no world record? | Repeat the cycle until you feel you can go no further without losing the car. Still no world record? | ||
| Line 259: | Line 264: | ||
Meaning it will roll easier but on the other side have less traction and grip as a low inflated tire. | Meaning it will roll easier but on the other side have less traction and grip as a low inflated tire. | ||
| − | ===== | + | ===== Final words ===== |
Being consistent as a driver is very good, since if you change your line or driving style the setup will react | Being consistent as a driver is very good, since if you change your line or driving style the setup will react | ||
differently each time. Try and settle into a groove when testing. This will produce more accurate test data. | differently each time. Try and settle into a groove when testing. This will produce more accurate test data. | ||
| Line 265: | Line 270: | ||
== Quick reference == | == Quick reference == | ||
[[image:Moby3.jpg|thumb]] | [[image:Moby3.jpg|thumb]] | ||
| − | If your car behaves in any of these ways test the following. | + | If your car behaves in any of these ways test the following. Keep in mind, that these are general suggestions and the steps might not be suitable for every kind of setup. |
| − | + | {| class="wikitable" style="font-size: 85%; width: 420px" | |
| − | + | ! My car understeers into the corner | |
| − | {| | + | ! My car oversteers into the corner |
| − | !My car understeers into the corner | ||
| − | !My car oversteers into the corner | ||
|- | |- | ||
| − | |Soften front com. damp | + | | Soften front com. damp |
| − | |Harden front comp. damp | + | | Harden front comp. damp |
|- | |- | ||
| − | |Soften rear reb.damp | + | | Soften rear reb.damp |
| − | |Harden rear reb.damp | + | | Harden rear reb.damp |
|- | |- | ||
| − | |More caster | + | | More caster |
| − | |Less caster | + | | Less caster |
|- | |- | ||
| − | |Softer front antiroll | + | | Softer front antiroll |
| − | |Harder front antiroll | + | | Harder front antiroll |
|- | |- | ||
| − | |Harder rear antiroll | + | | Harder rear antiroll |
| − | |Softer rear antiroll | + | | Softer rear antiroll |
|} | |} | ||
| − | + | {| class="wikitable" style="font-size: 85%; width: 420px" | |
| − | {| | + | ! My car understeers mid corner |
| − | !My car | + | ! My car oversteers mid corner |
| − | !My car oversteers mid corner | ||
|- | |- | ||
| − | |Soften front rollbar | + | | Soften front rollbar |
| − | |Harden front rollbar | + | | Harden front rollbar |
|- | |- | ||
| − | |Harder rear rollbar | + | | Harder rear rollbar |
| − | |Softer rear rollbar | + | | Softer rear rollbar |
|- | |- | ||
| − | |More camber | + | | More camber |
| − | |Less camber | + | | Less camber |
|- | |- | ||
| − | |More front downforce | + | | More front downforce |
| − | |Less front downforce | + | | Less front downforce |
|- | |- | ||
| − | |Less rear downforce | + | | Less rear downforce |
| − | |More rear downforce | + | | More rear downforce |
|} | |} | ||
| − | + | {| class="wikitable" style="font-size: 85%; width: 420px" | |
| − | {| | + | ! My car understeers out of the corner |
| − | !My car understeers out of the corner | + | ! My car oversteers out of corner |
| − | !My car oversteers out of corner | ||
|- | |- | ||
| − | |Harder front reb. Damp | + | | Harder front reb. Damp |
| − | |Softer front reb. Damp | + | | Softer front reb. Damp |
|- | |- | ||
| − | |Harder rear comp.d | + | | Harder rear comp.d |
| − | |Softer rear comp.d | + | | Softer rear comp.d |
|- | |- | ||
| − | |Less caster | + | | Less caster |
| − | |More caster | + | | More caster |
|- | |- | ||
| − | |Softer front antiroll | + | | Softer front antiroll |
| − | |Harder front antiroll | + | | Harder front antiroll |
|- | |- | ||
| − | |Harder Rear antiroll | + | | Harder Rear antiroll |
| − | |Softer Rear antiroll | + | | Softer Rear antiroll |
|} | |} | ||
| Line 337: | Line 338: | ||
{{Guides}} | {{Guides}} | ||
| + | [[Category:Guides]] | ||
| + | [[Category:Car setups]] | ||
<!-- links to other languages --> | <!-- links to other languages --> | ||
Latest revision as of 14:49, 6 June 2024
By Robert "Moby" Bjorkman
The problems most people have is to adjust their present setup to something that suits their driving style. If you have a set that you feel is fast, but just don’t know how to tune it to make it even better. Welcome to the introduction to setups. This guide will help you understand the basics of setup construction and setup development. To dive even deeper in the topic, see article Advanced Setup Guide.
For something visual, check out Chris Haye's "Sim Racing Setup Guide" playlist on YouTube, consisting of 13 videos detailing the various aspects of car setup. He also created a helpful, printable "cheatsheet" PDF with quick tips to adjust setups: https://drive.google.com/file/d/1-wnbyqBTJDySzDYU2VmHLfrU5MMihSUs/view.
Basics
To understand most of the information in this guide you must first have some basic information on how things work. Sections 1.1.0-1.5.1 are general to all racing games. Sections 2.1.0-2.3.4 are specific for Live for Speed.
Introduction to basic racing physics
It is a game of “Where does the weight go?”. Very simply put. When you brake a car at high speed all the weight transfers to the front of the car. When you accelerate all the weight transfers to the rear. When you turn left the weight goes to the right and the opposite. The car has a mass that wants to move around depending on what direction you want to go. What we want to do is to control this movement. For this we have a number of tools.
Springs
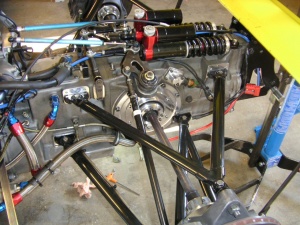
When the mass of the car moves it creates energy. This energy is absorbed by the springs on the car. The energy created from the chassis goes through the springs before affecting the tires. This means that if your springs are stiff most of the energy from the chassis will be absorbed by the springs. This gives us faster chassis movements, but will reduce the amount of travel of the tire. So if you're running on a bumpy track, the tire will just skip over bumps instead of keeping contact with the ground.
Dampers
The dampers on a car give us further adjustments to control the mass of the car. With the help of dampers we can now control how fast or slow the mass will compress or uncompress. This means that we now can control different points of a corner. I will show you a corner that will make you understand better.
Entry: You hit the brakes and start to downshift.
Weight: The weight goes to the front of the car. Your front dampers compress and your rear dampers
uncompress.
Apex: (Mid corner) You have turned into the corner and released the brake pedal.
Weight: The weight has now transferred to the side of your car. The dampers on the side of your car are
compressed and on the inside of your car the shocks are uncompressed.
Exit: You start to accelerate out of the corner.
Weight: The weight moves to the rear of the car. The rear dampers compress and your front dampers
uncompress.
The conclusion is this:
| Front | Rear | |
|---|---|---|
| Entry: | Comp. Damp | Reb. Damp |
| Exit: | Reb. Damp | Comp. Damp |
The softer you make a shock absorber the faster the weight is transferred. The harder you make it the slower the weight is transferred. So if I have a car that is understeering going into the turn I need more weight on the front end. You can change this by either making the front end softer so it squats more or loosen the rear rebound damping, so the rear end lifts up more and thereby transferring more weight to the front end. If I have an oversteering car out of the corner I can make the rear compression damp harder so that less weight is transferred to the rear, and I can change the Rebound dampening in the front so the front end doesn’t come up so much and there by less weight is transferred.
Rollbars
When you drive through a corner, the mass of the car moves to the side of the car. The anti-roll bar works so that it connects to left and right suspension to keep the suspension geometry aligned with the amount of mass moved so that the tires have maximum contact even when the car is tilted to the side. The anti-roll bar adds to the roll resistance without resorting to an overly stiff spring. A properly selected anti-roll bar will reduce body roll in corners for improved cornering traction, but will not increase the stiffness of the ride, or reduce the effectiveness of the tire to maintain good road surface contact.
How we use this tool. In simple terms this controls the amount of mass moved from side to side. If you have a stiff anti-roll bar setting it will increase stability but you will instead lose some of the traction available. The anti-roll bars are very good tools to adjust the overall balance of the car. If you want to change a specific part of the corner balance you use damper settings but if you need an overall balance change you adjust with the anti-roll bar.
Ride height
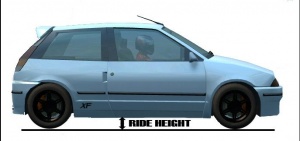
This setting adjusts the measurement between the ground and your car. A lower setting will lower the centre of gravity of your car, which will help overall handling. However, running a car too low will make the car touch the ground or bottom out the suspension, especially over kerbs and bumps. This will result in loss of speed and control.
Steering
Maximum lock: How much the front wheels' angle changes when you turn your wheel to full lock.
Caster: Controls the angle of the tire when steering. Simply put, more caster means more stability at high speeds, less caster more stability during low speeds. Also changes camber on front wheels when steering.
Parallel steer: The rate at which the angle between the front wheels changes as steering angle is increased. At high values, acts as toe-in when steering, while at low values, acts as toe-out when steering.
Wheels
The wheels are what connects the car to the ground. We have a few options here.
Toe
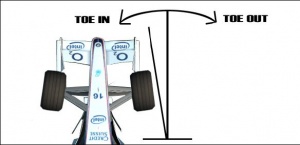
Toe: This is the direction the wheels are preset to follow. Toe-in will get you more stability; toe-out will get you more turn in capabilities but make the car more nervous.
Camber
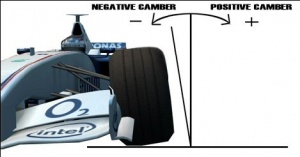
And we can change camber. If you have a lot of camber the car will go faster in a straight line due to that there is a lesser tire patch touching the ground. But a lot of camber will also reduce braking and accelerating abilities. All racing cars racing on normal tracks (not ovals) have negative camber. This gets the outside wheels in a corner to have an optimal contact patch with the ground. Ovals only turn one way and with heavy banking they need large amounts of negative camber on outside wheel and positive camber on inside so the inside tires also have maximum contact patch.
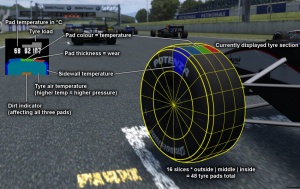
How to read tire temperatures to correct the camber.
If the temp looks like this you have too much camber:
| Outside | Middle | Inside |
|---|---|---|
| 70 | 81 | 110 |
If the temp looks like this you don’t have enough camber:
| Outside | Middle | Inside |
|---|---|---|
| 90 | 80 | 55 |
Pressure
We also have the option to adjust the pressure in the tires. If you have low air pressure you get more grip but if you have more air your car will go faster in a straight line. More pressure will also add more precise handling.
Gearbox
The gearbox controls the amount of rpm and torque being transferred to the wheels from the engine. The gearbox is optimized using different gear ratio settings so that the engine always works in correct revs.
Gearing
Here we can set individual components for the gearbox. We have a final drive; with this we can control the entire gear set to either give us more acceleration or a higher top speed. The individual gears can also be changed to suit a certain corner.
Differential
Differentials are quite complicated to explain. Basically it controls the amount of power from the gearbox to the wheels. This factor can be changed so that both wheels get same amount or different amounts depending on what wheel has most slip. The different differential types are.
- Locked diff is the factor between the rear wheels are constant. Both wheels travel the same distance. This however creates resistance as the wheels do not travel the same length when turning. A car with locked diff would want to go straight forward and is therefore perfect for drag racing.
- Open diff allows the driven wheels to travel at different lengths. This however means that when one wheel loses grip it will keep spinning until power is released. Not suitable for racing.
- Clutch pack LSD is somewhere in between the two previous as it allows the wheels to go different lengths but still apply some lock. This often comes with the coast/power being adjustable. Meaning you can control how much lock you want while being off the throttle (coast) or on the throttle (power).
- Viscous LSD is like the clutchpack but being speed sensitive. If one wheel spins faster then the other it tries to transfer power to the other wheel, and the faster the first wheel is spinning the more power is transferred to the other.
In a real racing environment a clutchpack LSD is almost always the only one used.
Brakes
Brakes are what stops the car. The amount of pressure applied to the brake discs can be set to different levels. This is mostly done by trial and error. When you apply max force you want the wheels only to start locking right before you turn into the corner.
Brake balance can also be changed to suit different conditions. Brake balance adjusts the amount of pressure that goes to the front brakes and rear brakes. An optimal value would be 50/50 but since weight is being transferred to the front end of the car, the rear end gets less mass and therefore gets easier to lock the rear wheels. A good value is therefore around 60% front and 40% rear. If you're locking up the rear-end while braking you need more brake balance to the front. Front and rear should lock up at the same time, then you have the optimal setting.
With some cars, you can adjust brake balance on-the-fly (while driving), using the F11 Live Settings panel (for example on FOX or XRR).
Aerodynamics
The airflow around your car can be adjusted with the help of wings, chassis shape and underground effect. Wings create negative lift (downforce) to help your car stay on the track. This will make you go faster around corners but will reduce your top speed. Underground effect creates a vacuum under your car to suck your car to the ground. This is made by so called venturi tunnels. The underground effect is very dependant on the ride height. The closer the car is to the ground the more effect it gets. (Underground effect dependant on ride height not implemented in LFS, yet.)
The wing settings is often calculated so that for every notch you adjust on rear wing you have to adjust two notches on front wing, to keep same balance in the car.
Development process from scratch
Now we know the basics of the car. We must now learn how to use this information effectively. Most race engineers in the real world have their own model of a test day or test session. I will teach you the basics of mine. It may not suit everyone, but it will give you a platform to work from and may help you to develop something of your own. The biggest difference is that in sim-racing you have no budget to keep to. I will however run this as a real world example but adopt it to the "Live For Speed" platform. This part will assume you can drive two laps without crashing.
Track day
Out on the track for the first day. You must have certain elements under control. The setup must be looked at roughly. If you are totally blank on information for the vehicle, just set everything with suspension, steering, aerodynamics and differential at medium. Is it a fast track or slow track? That decides what to start with in the gearbox. Amount of laps you think you will run and then fill the gas tank accordingly.
Steps
- 1 Prepare. When out on the first lap I always turn on the tire temperature screen (F9). Here you can see the different temps of the tires. Blue means they are cold. Now always allow the first lap to heat up the tires, any feedback you get from cold tires is useless. Green means they are coming into optimum range. Red means they are getting too hot and black means you have a puncture.
- 2 Test properly. Now you should be on your second lap. Tires should show green. After the first lap you should have a rough feel for the car. Testing properly means you run at race tempo. Going slower will not result in correct tire data or balance, going faster means you will end up in a wall. During the second lap you make mental notes of each corner. Noting balance, brakes and revs through the corners.
- 3 Data handling. Coming in on third lap you have two choices.
- 1Go on to drive until you have mental notes of all corners.
- 2Stop, check temperatures and make notes of them. Correct camber according to (1.2.3). A constant eye on tires and temp. are a must during all testing, you should always make sure you have optimum camber. Doing a qualification setup can mean running more camber than usual.
Analysing
When you’re in the garage you think back on your mental notes. What was the biggest problem? Adjust only one thing at a time, mixing things will often result in over doing it and not knowing what did what.
Go through steps 1, 2, 3 again. Change one thing and repeat. Now what to tune first. I have here a list of what I focus on. I usually go through the list pretty quickly the first time, to get a good base to work from. Keep in my mind that I’m constantly changing the camber during these changes.
- Brakes
- Springs
- Anti-roll bars
- Aerodynamics/Gearbox
- Dampers
- Steering, caster, parallel steer
- Tire pressure
Most changes will result in affecting other things on your setup, keep in mind you may have to go through the list a couple of times. Aerodynamics has such large influence on top speed and cornering speed that you should try and adjust the gearbox to suit the different aero settings you are testing. Making sets are time consuming. In the end you will have a set that perfectly suits you which is the aim of this guide.
Tuning existing setup
Different controls
What parameters is special for each control and controller setting? Isolating these will help you to tune it to your wheel.
These are found under steering in the garage. The first one is maximum lock. This value will control how many degrees the wheels will turn until it’s fully locked. If you feel a set is nervous and someone else feels its very stable then this setting should be reduced. If you feel it’s not turning at all then you should increase this setting. I usually play a lot with this setting. For example if the setup creator has a MOMO wheel I know that maximum lock should be reduced 1-3 notches to suit my Act-labs wheel.
Then we have the other setting its called controller wheel turns x degrees. How it works is better explained elsewhere, but the important thing is that you have a value on top of the slider. That is the recommended value for you to use. I feel much more precise if I set the value to around 30-35% of the recommended value in controller wheel turns in steering menu. However, this might not have the desired effect on all wheels. You should test out a value for both these settings to suit you. This might be required for all sets you get but after a while you will know pretty quickly what do which each set.
After adapting the set to your wheel you will be able to analyse better how the set works and what good points there is on this particular set.
Analysing
Read (2.1.3). What I would like to add is, if you’re running a good set you only need small changes. By small I mean changing 2-4 notches in either direction. The tricky part is when you have a setup that you like, but you’re just not fast enough. What do we change then?
There is no secret that most people download setups or ask others to share with them. However this is no certainty for success. Driving styles, different controls and control setup will upset the balance or change different aspects of the set. So what makes a world record set for one guy is not a world record set for someone who doesn’t use the same control options.
The most information when receiving a set is when you compare it with your old set. Analyse why it works. Is there some special parameter that is very different from your old set? The best sets I have made is often a rear end combined with a front end from some other set, and then I combine these two with a gearbox from a third set and so on. Take all the best pieces from each set and put it into one. But first we must understand some of the basics of the new set.
Faster vs. safer
Going faster means you are pushing towards what physics allow. When you get closer to that limit it will mean losing some of your control. When you are the fastest in the world it means you’re the one that is closest to the limit of the car without losing control. At one point in your set development, you will get to the point when you cannot make the car go faster in a straight line, because then you lose in the corners. When you have a decent balance in the car, you try and see if you can go further without losing control. This is done in small steps.
- 1 Reduce downforce, 2 notches at front and 1 at rear. If still good, then move on.
- 2 Higher tire pressure, when its too high you will lose traction.
- 3 Optimize gearing
- 4 Reduce toe
Repeat the cycle until you feel you can go no further without losing the car. Still no world record?
Improve yourself
A large part to success is preparation and practice. Practicing at making setups is only one part of the big puzzle that makes world records. There are shortcuts though. Running with other skilled racers and watching replays of world records. Analyzing where you’re slower and what you’re doing wrong are great things that are guaranteed to make you go “oh, could I go that fast there?”.
Endurance setup
In these days long distance races are popular. It’s a mix between having a good set and good consistent driver. Making tires last is a complex thing and it’s different depending on combo. Full tank balance is different to empty tank balance and so on.
Analyzing
The first thing you have to do is a full stint with the current setup. Full tank and push it to the max until the tires gets so hot that you cannot drive it anymore or you get a flat tire. The data should help you come to terms with the balance during the stint. A perfect balance during the entire stint will be almost impossible. At the start of the stint you should have a little understeer and as the fuel disappears it should more and more go over to neutral and towards the end of the stint even oversteer. The critical point is when the tires has reached its highest stint temperature, after that the tires should very slowly go down in temperature. After the tire peak has occurred you have your most valuable laps. Here you should be able to use the car to its maximum without any difficulties.
Tires
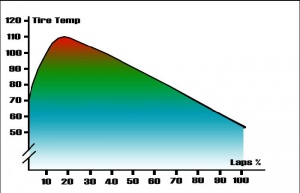
The tire in LFS has a cycle. It starts cold and starts to heat up and will reach a peak temperature, and as it starts to wear down the tire will release some of the heat and start to go down in temperature. This cool off effect is greater then in real life and on some tracks you must balance the peak and the eventual puncture temperature. Having higher airpressure in the tires will make the tire peak temperature lower. Having perfect camber and minimizing slides is also things that make the tire last longer and also bring down the peak temperature slightly.
If we go more into detail, a softer spring is also something that extends tire life. Although this effect seems very small in LFS. Toe in/out also adds to roll resistance. More tire pressure will give you a more precise handling and since it will deform less and reduce flex in the tire wall it does not use as much energy as low inflated tire. Meaning it will roll easier but on the other side have less traction and grip as a low inflated tire.
Final words
Being consistent as a driver is very good, since if you change your line or driving style the setup will react differently each time. Try and settle into a groove when testing. This will produce more accurate test data.
Quick reference
If your car behaves in any of these ways test the following. Keep in mind, that these are general suggestions and the steps might not be suitable for every kind of setup.
| My car understeers into the corner | My car oversteers into the corner |
|---|---|
| Soften front com. damp | Harden front comp. damp |
| Soften rear reb.damp | Harden rear reb.damp |
| More caster | Less caster |
| Softer front antiroll | Harder front antiroll |
| Harder rear antiroll | Softer rear antiroll |
| My car understeers mid corner | My car oversteers mid corner |
|---|---|
| Soften front rollbar | Harden front rollbar |
| Harder rear rollbar | Softer rear rollbar |
| More camber | Less camber |
| More front downforce | Less front downforce |
| Less rear downforce | More rear downforce |
| My car understeers out of the corner | My car oversteers out of corner |
|---|---|
| Harder front reb. Damp | Softer front reb. Damp |
| Harder rear comp.d | Softer rear comp.d |
| Less caster | More caster |
| Softer front antiroll | Harder front antiroll |
| Harder Rear antiroll | Softer Rear antiroll |
