Difference between revisions of "Game Modes/Single Player"
(fix number of AI for s1/s2/s3 modes) |
(info/tip as mbox) |
||
| Line 21: | Line 21: | ||
INFORMATION: Currently AI-players can't drive on windy tracks.<br> | INFORMATION: Currently AI-players can't drive on windy tracks.<br> | ||
| − | '''Laps:''' The grey buttons allow you to choose how many laps you want to race. Choosing 0 laps will start an unlimited practice session which probably is the best way to learn new cars and tracks as you can do as many timed laps as you want. As soon as you select 1 or more laps to race, an additional control appears which lets you choose if you want to have a qualifying before the race and how long it should be. | + | '''Laps:''' The grey buttons allow you to choose how many laps you want to race. Choosing 0 laps will start an unlimited practice session which probably is the best way to learn new cars and tracks as you can do as many timed laps as you want. As soon as you select 1 or more laps to race, an additional control appears which lets you choose if you want to have a qualifying before the race and how long it should be. |
| − | + | ||
| − | + | {{mbox | |
| + | | small = yes | ||
| + | | text = The number of laps is limited to a max of 1000. By going above that, you can also choose 1-48 hours for endurance races. | ||
| + | }} | ||
| + | |||
| + | {{mbox | ||
| + | | type = tip | ||
| + | | small = yes | ||
| + | | text = Right-clicking on the buttons will change the value in larger steps. This also applies everywhere, so in Garage, Options, etc. | ||
| + | }} | ||
=== Game Lobby Screen === | === Game Lobby Screen === | ||
Revision as of 08:41, 2 September 2024
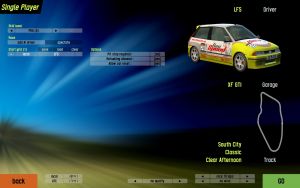
Even though Live for Speed was developed to offer the best online racing possible, its single player mode is not only a necessary addition but also very useful in different aspects. The single player can be used to learn new tracks, develop setups or even practice some overtaking against the AI. If you make a mistake in single player mode, you will never anger anyone – except yourself, perhaps.
Skill Level: The speed of the AI can be varied from Beginner to Pro.
Add AI driver: You can add up to 32 AI drivers to the race. If you only have a demo license, you can add then up to 12 AI drivers.
Join Race: This allows you to enter the race yourself. If you have already added 32 (or 12 in demo) AI drivers to the race, you will not be allowed to join yourself as 32 (or 12) is the maximum number of racers allowed.
Start grid: This is a list of all participating drivers. Clicking on a drivers name will select this driver, clicking on the - in front of the name will remove the driver from the grid. You can also save your starting grid or load an existing one.
Swap position: This button will only be visible when an AI has been selected from the grid. When you click on this button you will swap position with the selected AI in the grid.
Player: This button directly takes you to the player's options, allowing you to change the name, the driver model you use and your nationality.
Garage: This button takes you to the pits where you can set up and tune your car.
Track: This button lets you choose the track, its configuration, the weather and the time of day.
Wind: This button lets you choose the wind type on the selected track. It has three settings, no wind, low wind and high wind. The wind direction and speed is randomized by LFS and it will have a noticeable impact on your laptimes and braking points!
INFORMATION: Currently AI-players can't drive on windy tracks.
Laps: The grey buttons allow you to choose how many laps you want to race. Choosing 0 laps will start an unlimited practice session which probably is the best way to learn new cars and tracks as you can do as many timed laps as you want. As soon as you select 1 or more laps to race, an additional control appears which lets you choose if you want to have a qualifying before the race and how long it should be.
| The number of laps is limited to a max of 1000. By going above that, you can also choose 1-48 hours for endurance races. |
| Right-clicking on the buttons will change the value in larger steps. This also applies everywhere, so in Garage, Options, etc. |
Game Lobby Screen
In the game lobby screen you will set up your single and multiplayer races. Here you can choose your car, including it's skin and setup, the track and set up how long you want to race.
Let’s examine the buttons you can access and their usage. You can see a skill level button labeled pro with an arrow at each end, this button controls the level of intelligence for the AI (Artificial Intelligence) clicking on the left arrow lowers the value, the right increases the value, newbie is the lowest value and starting point, pro is the highest level.
The next button under the skill level is the add AI button, this adds a robot car to LFS ready to race against you, against another AI car or the clock. Up to 12 (Demo) or 32 (S3/S2/S1 only) AI can race at the same time (or 11 AI + you, and 31 AI + you). AI racing is fun and a great way to learn the tracks, racing lines etc., AI can consist of different cars against each other, due to similar outputs and abilities many LFS racers have pitted the GTi against the GT and close racing & great spectator fun has always ensued.
The join race button is self explanatory; this allows you to add your car, manned by you and join in the fun. Looking now to the group of buttons to the right of the screen, we see that the next button is called the player button.
Garage Area and Car Settings
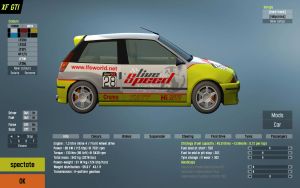
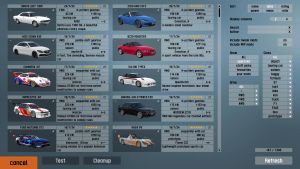
Next we have the main screen you probably will deal with in LFS, this is the garage area, it is here you select your car type, create, add and delete setups and modify all kinds of stuff. Most of these buttons are very easy to figure out and largely self-explanatory, starting from top left we see the car colours panel.
The car colours panel allows you to add, delete and modify the colour schemes of your own prepared skins and some LFS supplied skins. Clicking on the individual colour icon, or using the new button to add a new named skin to the list, from a pop up selection of named skins in the data\skins folder.
Under the colour panel is the driver and force panel, this allows you to turn on force lines to show the level of force on the car and add a driver and rotate and bounce the car. Have a play around with it and see the difference stiffer suspension, driver weight, has etc.
The vertical row of buttons (right) contain your car setups for the selected car. Setups sent to you in multiplayer mode will appear here, as well as setups you may have downloaded from LFSForum or some other site. The new button will allow you to make a copy of the currently selected setup, (you then make changes to the new one preserving the original) delete removes the selected setup from the list and LFS.
The most important part on this screen is the horizontal row of car setup buttons, as the naming suggests you can alter the settings of many components here. Info view has details about each car such as weight, power output, drive train etc. In this view you can also adjust the amount of fuel and ballast and set the percentage of intake restriction.
This whole area has its own separate guide to allow you get the most out of the ability to customise your car for optimum performance and fun. However, briefly, you will notice that all sub menus have sliders to increase or decrease the selected values. Using the sliders you may also right-click on any slider to directly type in the value or you can copy and paste values with Ctrl + RMB and ⇧ Shift + RMB respectively.
Make a copy of the default hard track setup by highlighting it, click New setup to create a copy and save under a different name and play around with the settings by increasing or decreasing items, use small adjustments at first etc, when finished click OK to return to the Lobby screen and add to race by clicking the join race button.
Track Selection
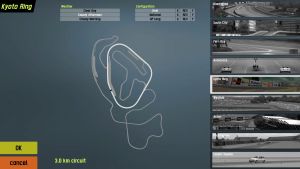
Next we will cover the last button; the track selection button, pretty important as we need a safe place to race our cars, hey? You will see a small map showing the selected track from an overhead view and details on the overall length of that track.
There are seven major track areas for racing, the sevenths area Autocross is a skid pad zone for building tracks and experimenting, as well as a two and eight lane drag strip area. To use a track, simply select the desired track from the main areas on your right, this will bring a submenu containing all the tracks available for that particular raceway. You can then choose which of the separate tracks to race on by clicking on that track name. After choosing the track layout, any available Autocross layouts for your chosen track will appear to the right below the available configurations. A map showing the track path is then displayed, and options to change the weather conditions (lighting only) are available from the weather menu, with its three options:
BRIGHT CLEAR - OVERCAST - CLOUDY SUNSET/DUSK - You have to make the choice! At this stage of LFS development actual weather conditions, such as rain, hail, fog etc have not been implemented, nor has night racing.
The X and Y buttons switch to a open track configuration. That means you can go anywhere you like at the track. You can also create custom track configs by adding checkpoints and blocking the unnecessary roads with barriers. Pit lane and starting grid depends on which X or Y you select - so e.g. South City Chicane Route X will have the same pit lane and grid as the normal track.
Clicking the OK button or clicking the track image will lock in the selected track and options you have chosen and return you to the Single Player selection screen where you can join the race and start racing by clicking the GO button.


