Difference between revisions of "3D Render Tutorial"
| Line 31: | Line 31: | ||
Save these 4 views using the View – Save active xxxx view menu | Save these 4 views using the View – Save active xxxx view menu | ||
| − | == | + | == Rims Mapping Correction == |
Put the « Perspective View » in full screen using this button: | Put the « Perspective View » in full screen using this button: | ||
| Line 56: | Line 56: | ||
018 -> 2nd part of the rim – Front@Right | 018 -> 2nd part of the rim – Front@Right | ||
| − | The problem is that the 1st part of the rim is mapped with the tire’s texture. 2nd part of the rim is mapped correctly. The goal is to assign to the 1st part of the rim | + | The problem is that the 1st part of the rim is mapped with the tire’s texture. 2nd part of the rim is mapped correctly. The goal is to assign the right material ID to the 1st part of the rim. |
| − | First, we must know the material | + | First, we must know the material ID of the 2nd part of the rim. To do this, select only one of the 2nd part of the rim (object 009 for example). Right click on the screen and choose « Hide Unselected » in the menu in order to display only the object 009. |
Click on the icon « 1 » (see the screenshot below) then on the icon “2”. Go to menu ''Edit'' – ''Select All'' | Click on the icon « 1 » (see the screenshot below) then on the icon “2”. Go to menu ''Edit'' – ''Select All'' | ||
| Line 76: | Line 76: | ||
So, you must swivel the view in order to see the back of the rim. Redo the rim’s selection holding down the CTRL key in order to add the selection to the previous one. | So, you must swivel the view in order to see the back of the rim. Redo the rim’s selection holding down the CTRL key in order to add the selection to the previous one. | ||
| − | You can now assign the | + | You can now assign the material ID n°4 to the 1st part of the rim (instead of n°9) |
Repeat those steps to the 3 others rims. | Repeat those steps to the 3 others rims. | ||
Revision as of 17:03, 20 December 2006
Introduction
Christophe Pratlong (Grudd)
What do you need
- 3ds Max: http://www.discreet.com/3dsmax/
- S2 CMX Viewer: http://www.liveforspeed.net/?page=addons
- Brazil r/s: http://www.splutterfish.com/sf/sf_gen_page.php3?page=rio
- CMX importer: http://forum.rscnet.org/showthread.php?t=147186
Other information
- We suppose 3ds max is installed into C:\3D Studio Max\
- S2 CMX Viewer is installed into C:\Jeux\S2\
- 3ds max and Brazil r/s must be properly installed
- For this tutorial we are going to work on the XF GTI (or XFG as it is also known)
CMX Model Importation
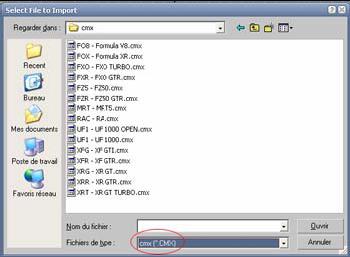
File - Import – Browse to your LFS folder\data\cmx, for example C:\LFS S2\data\cmx
Open the file XFG – XF GTI.cmx
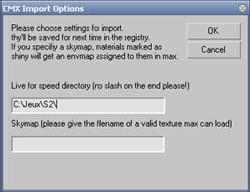
Specify the path where the S2 CMX viewer is installed in order to get the right textures. Put nothing in « Skymap » box. Click “OK”
If those previous steps have been done correctly, you should have this:
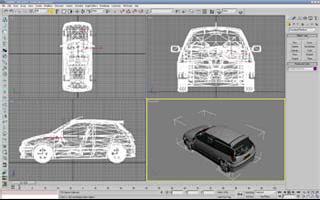
Save these 4 views using the View – Save active xxxx view menu
Rims Mapping Correction
Put the « Perspective View » in full screen using this button:

Display the list of all scene’s objects clicking on
You should have:
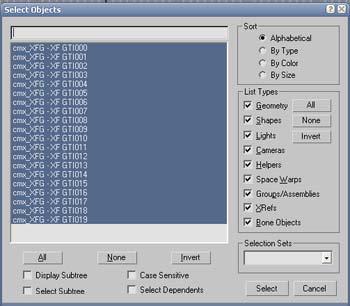
008 -> Tire + 1st part of the rim – Rear@Left
009 -> 2nd part of the rim – Rear@Left
011 -> Tire + 1st part of the rim – Rear@Right
012 -> 2nd part of the rim – Rear@Right
014 -> Tire + 1st part of the rim – Front@Left
015 -> 2nd part of the rim – Front@Left
017 -> Tire + 1st part of the rim – Front@Right
018 -> 2nd part of the rim – Front@Right
The problem is that the 1st part of the rim is mapped with the tire’s texture. 2nd part of the rim is mapped correctly. The goal is to assign the right material ID to the 1st part of the rim.
First, we must know the material ID of the 2nd part of the rim. To do this, select only one of the 2nd part of the rim (object 009 for example). Right click on the screen and choose « Hide Unselected » in the menu in order to display only the object 009.
Click on the icon « 1 » (see the screenshot below) then on the icon “2”. Go to menu Edit – Select All
Thus, we know that the material’s ID of the rim is the n°4 (step 3 on the screenshot below)

- Now, select the object 008 (only this object must be on screen)
- Go to the selection mode (see previous screenshot)
- Check the box « Ignore Backfacing »
- Choose the circular selection tool:
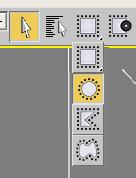
- With this tool, select only the rim’s vertices. Note that only visible vertices will be selected.
So, you must swivel the view in order to see the back of the rim. Redo the rim’s selection holding down the CTRL key in order to add the selection to the previous one.
You can now assign the material ID n°4 to the 1st part of the rim (instead of n°9)
Repeat those steps to the 3 others rims.
Material Correction
Open the windows Material Editor and Material/Map Browser using the Rendering menu
In the window Material/Map Browser select the radio button « Scene »
Now, move the material named « mtl_XFG - XF GTI » into an empty slot of Materiel Editor’s windows. Choose « Instance » if a message appears.
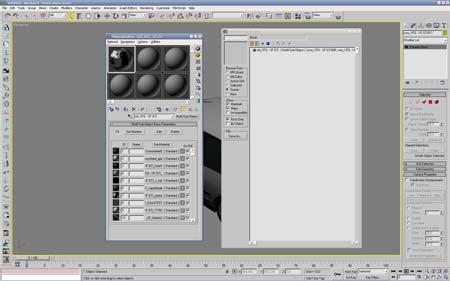
You can notice that our model has 19 material’s ID. Some of those IDs are empty (default 3ds material), others got a bad quality, some others are “bugged”. For example our material’s ID n°4 (rims’ material) is a 3ds default material. We’ll have to change it.
First of all, we’re going to repair the bugged materials. They are two : the tire’s texture and the steering wheel’s grip texture. Indeed, those textures appear white if we don’t repair them.
Material’s ID N°2 -> Cromowheel_grip and material’s ID n°9 -> XF GTI_TYRE
- In material editor, select ID n°2. Open the « Maps » section and click on the texture’s name (Cromowheel_grip.tga)
- Open now the section « Output », and check « Enable Color Map ».Move the cursor down in order to obtain a value between 0.2 and 0.3 (lower it is, darker the texture will be)
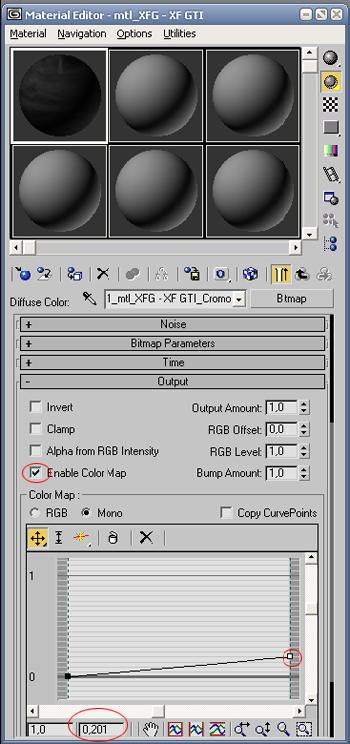
Repeat those steps to the tire’s texture (ID n°9)
Our first render
We’re going to do our first render. A fast and simple one.
First we must assign « Brazil » in the renderer assign menu. To do this, click on Rendering – Render menu. NOTE : leave « Default Scanline Renderer » for material Editor.
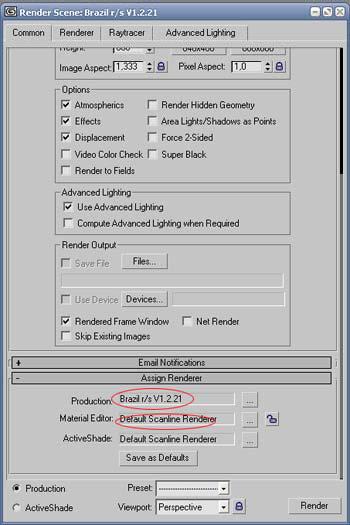
Then open the « Renderer » tab.
- In the « Brazil : Image Sampling » section, click on the “P3” button
- Then open the « Brazil :Luma Server » section. Apply the settings:
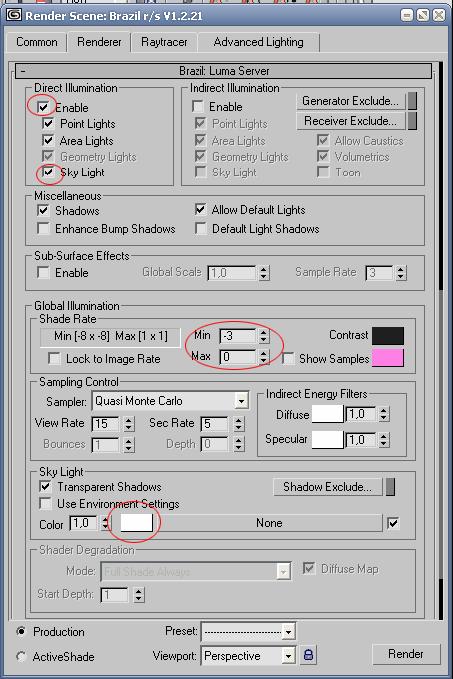
- Then open the « Brazil : CSG Server » section and check « Enable »
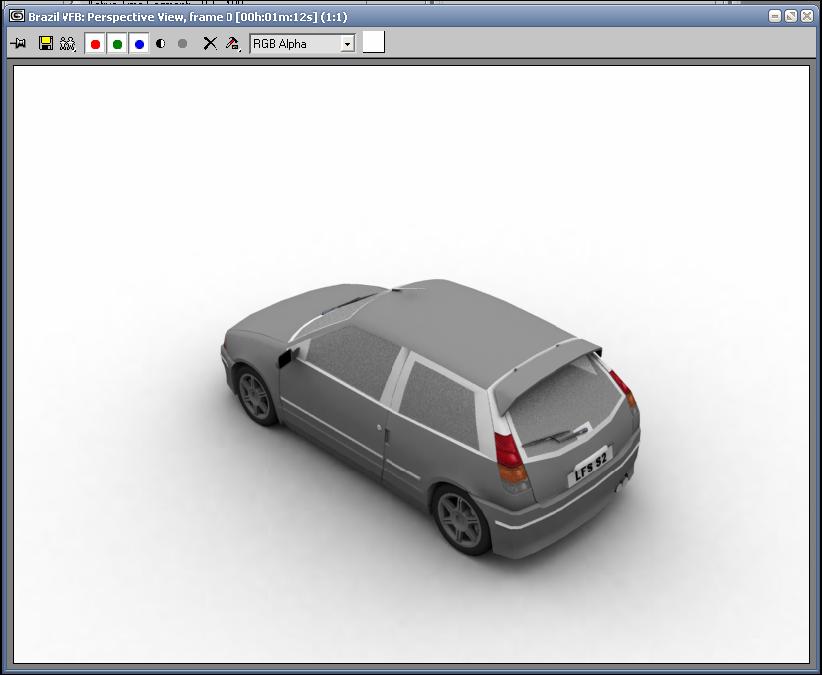
- You can now click on the « Render » button. An error message should tell you that he can’t found the « default » texture (it’s the car’s texture). Don’t worry, and click on Continue…please wait… you should have this kind of pic:
Textures/material’s adjustment
We must now assign a skin to the car – a metal material to the rims and a better glass material to the windows.
Car’s skin
Car’s body is the object 019. To know its material’s ID, select one of its vertices (see chapter n°2) Thus, you’d be able to learn that the ID is n°14. We’re going to replace this material. To do this, open the « Material Editor » windows and select an empty slot. Click on the « Standard » button. Then, select « Brazil Basic Mtl » and apply the settings below (don’t pay attention for the moment at the « M » next to the Diffuse et Reflect boxes)
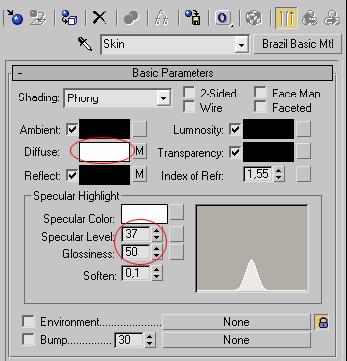
Then open the « Maps » section. Check the « Diffuse » box, click on the « None » box and choose « Bitmap » Select the skin (S2 format) you like. Back on the « Maps » section, check the « Reflect » box, put a value of 55 and click on the « None » box. Choose « Falloff » - Apply the settings below:
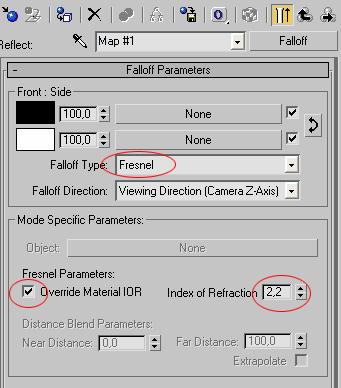
Finally, move this new material into the the material’s ID n°14 (it’ll replace the old one)
Glass material
Create a new brazil basic material with those settings:
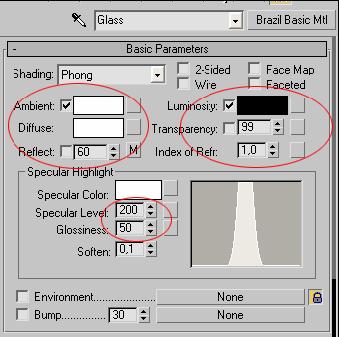
In the « Maps » section, check only the « Reflect » box, leave the value 100 and put a « falloff » effect with default values.
Move this material into the material’s ID n°18.
Rim’s material
Create a new brazil basic material with the settings below (note: the “Diffuse” color will be the rim’s color)
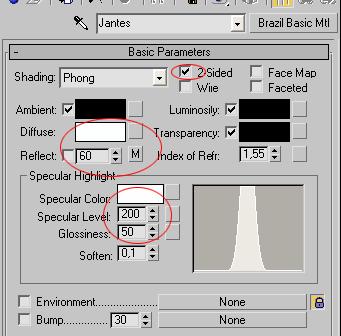
In the « Maps » section, check only the « Reflect » box, leave the value 100 and put a « falloff » effect with default values.
Move this material into the material’s ID n°4.
You can now launch a new render. I think you’ll notice that there is still a bug : windows are surrounded with a white material… ugly
We must know what is the ID of this ugly material… you should know how to do this now ! It’s the ID n°15.
In the « material editor », we notice thath the ID n°15 corresponds to the XF_Interior1.tga texture located in C:\Jeux\S2\data\pic\tga
Open this texture in your favorite bitmap editor (Paint Shop Pro or Photoshop for example) and modify the color of the square (in bottom on the right)
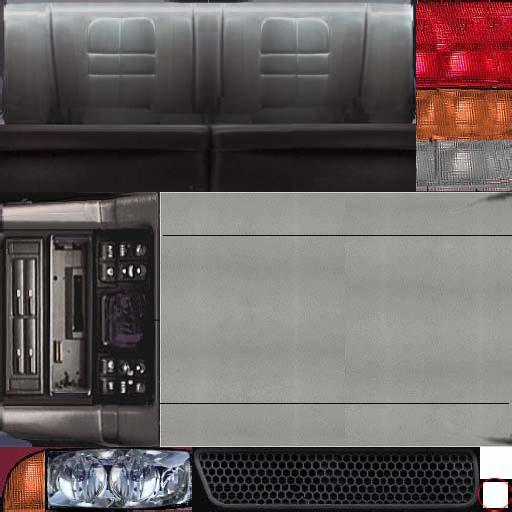
You can choose a black color with RGB values 25-25-25.
You can now launch another render; You should have this kind of result:
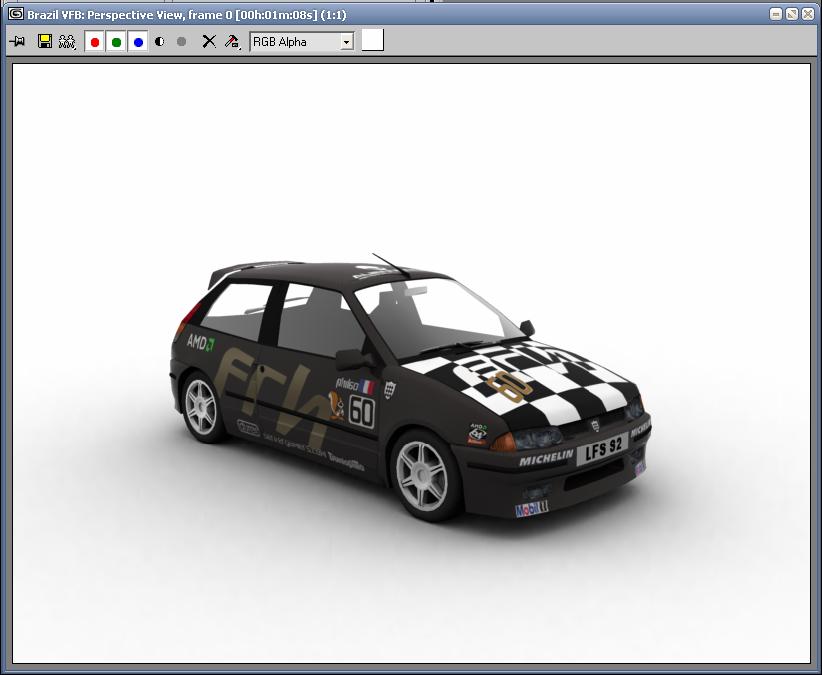
There are 3 materials left to modify. You will modify them by yourselves (it’ll be a good exercice)
- Assign the right texture to the brake disc (find it in the material editor – the bitmap assigned to it is blank)
- Exhaust material is perfectible (you can assign a chrome material for better result)
- Modify the « padzs.tga » texture in order to have red brake pads.
Remember that the basic thing is to find the material ID of the object you want to modify.
Improvement of the render’s quality
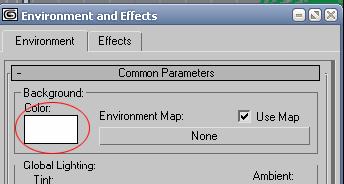
- Click on the Rendering – Environnement menu. Put the background color white.
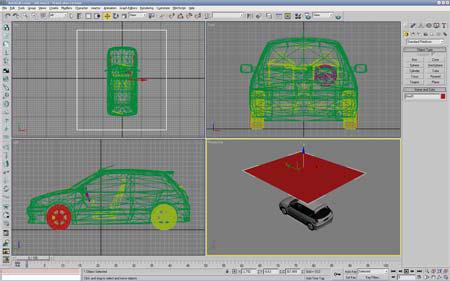
- We’re going to create a reflexion box. To do this, click on Create – Standard Primitives – Box (thickness must be at 0). Move this box using the tool
 with the top of the car.
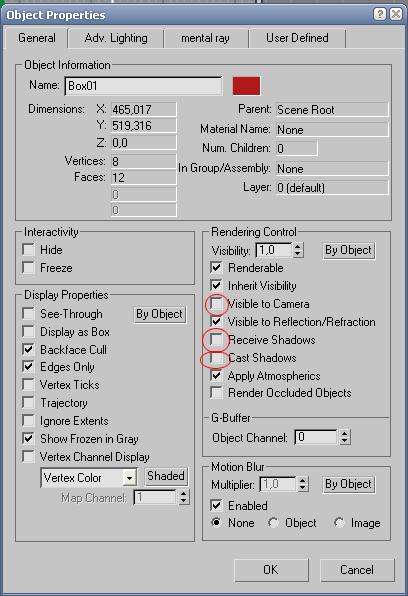
- Open the properties of this reflexion box (right click – properties) and uncheck the following options:
- Open « Material Editor », and select an empty slot. Click on the « Standard » button. Then, select « Brazil Utility ». Check the box « 2-Sided », then click on the « None » box next to the white color box and choose « Output »
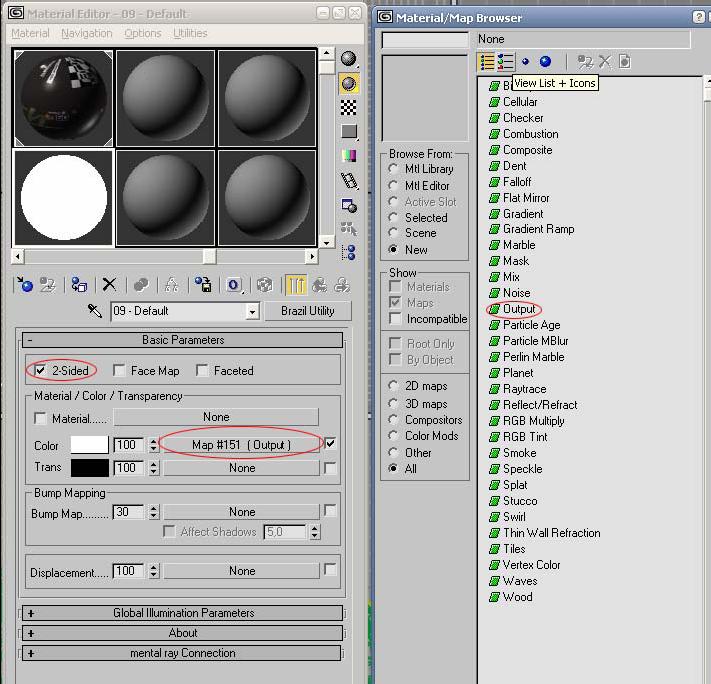
In the output section, put a 3,0 « RGB Level »
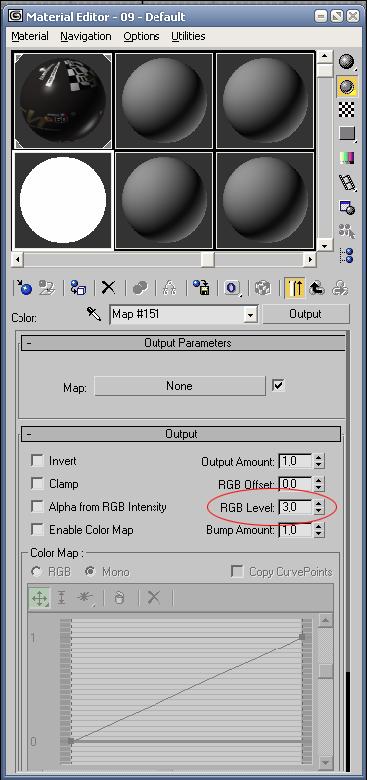
Finally, click on the « material » menu and choose « Assign to Selection » (only the reflexion box must be selected)
Last step, play with the camera to choose the view you want to render, click on Rendering – Render menu and apply the settings below for the “Luma server” section.
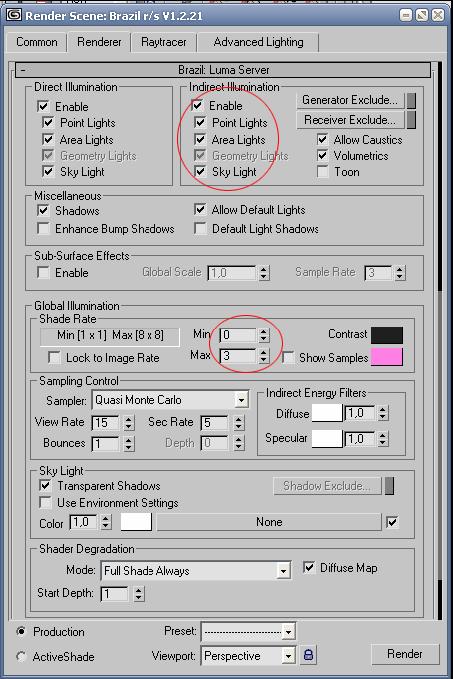
After 5-10 minutes (depending of your processor), you should have a picture like this:
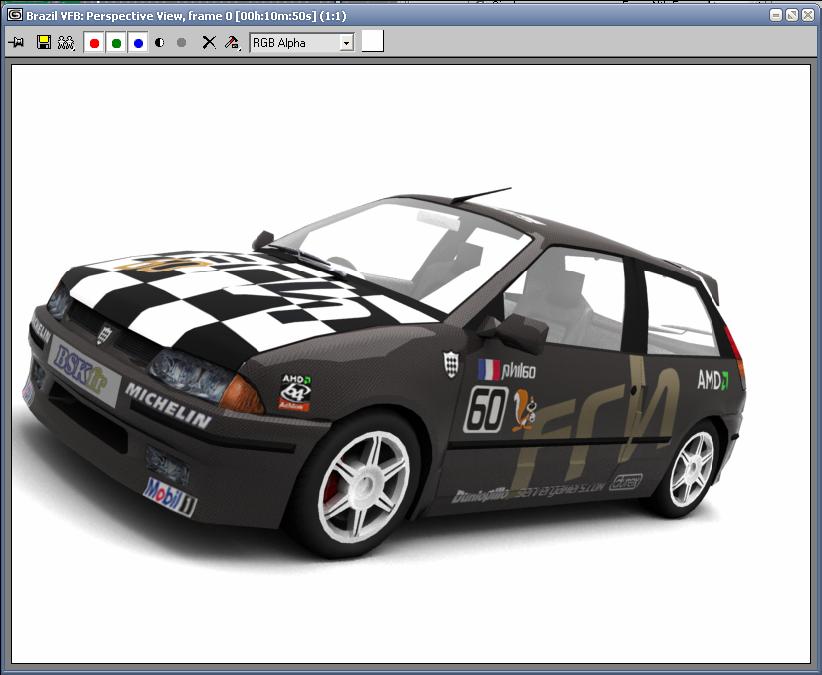
Play with the position of the reflexion box in order to obtain the lightning you want.
That’s all for this tutorial.
You can render all other S2 cars in the same way.