Difference between revisions of "Display"
m (→Tyre temperature/wear & clutch temperature (F9): key template) |
|||
| (2 intermediate revisions by one other user not shown) | |||
| Line 145: | Line 145: | ||
The F9 display shows four small windows each containing a 2D profile of a tyre, some numbers and three grey bars. | The F9 display shows four small windows each containing a 2D profile of a tyre, some numbers and three grey bars. | ||
| − | There are six areas in the diagram - three contact patches, the sidewalls and the air temperature. Each area goes from dark blue (cold) through green (ideal) and into red (overheated). There is also black, but that is only shown inside the tire after a blowout or puncture. Above the tyre diagram, there is a set of three numbers, which give the exact temperature of that tyre part. However, these numbers only represent the average temperature of the whole contact patch (from the inside up to the surface) - if you press and hold Ctrl | + | There are six areas in the diagram - three contact patches, the sidewalls and the air temperature. Each area goes from dark blue (cold) through green (ideal) and into red (overheated). There is also black, but that is only shown inside the tire after a blowout or puncture. Above the tyre diagram, there is a set of three numbers, which give the exact temperature of that tyre part. However, these numbers only represent the average temperature of the whole contact patch (from the inside up to the surface) - if you press and hold {{key press|Ctrl|Shift}}, you can see the the actual ''surface'' temperature, which rises and falls much more quickly during a race. Bear in mind that since the tyre diagram only shows the ''top'' section of the corresponding tyre, a 'flat spot' on a spinning wheel is represented by little flashes of red. |
If the tyre diagram changes its colour to orange, it means that ABS is active and is preventing the wheel to lock. | If the tyre diagram changes its colour to orange, it means that ABS is active and is preventing the wheel to lock. | ||
| Line 167: | Line 167: | ||
'''Spring/Damper damage:''' Shows how intact your [[Advanced_Setup_Guide#Bump_.26_Rebound_Damping|damping]] is. If the bars become red, the damping failed completely, which you will immediately notice because your car will be jumping all over the place. | '''Spring/Damper damage:''' Shows how intact your [[Advanced_Setup_Guide#Bump_.26_Rebound_Damping|damping]] is. If the bars become red, the damping failed completely, which you will immediately notice because your car will be jumping all over the place. | ||
| − | Also in this display, similarly to F9, | + | Also in this display, similarly to F9, four smaller optional panels are displayed (CT, engine health, accelerometer and estimated laps given fuel use). |
==== Live settings (F11) ==== | ==== Live settings (F11) ==== | ||
| Line 176: | Line 176: | ||
Note: The changes made on this display are applied (almost) immediately! So better don't fool around with the brake balance when approaching that tricky hairpin. Furthermore, not all cars can adjust all three settings. The RaceAbout, for example, has no rear anti-roll bar. | Note: The changes made on this display are applied (almost) immediately! So better don't fool around with the brake balance when approaching that tricky hairpin. Furthermore, not all cars can adjust all three settings. The RaceAbout, for example, has no rear anti-roll bar. | ||
| + | |||
| + | Handicaps (if any) are also shown on this screen, for informative purposes (can't be changed on-the-fly). | ||
==== Pit instructions (F12) ==== | ==== Pit instructions (F12) ==== | ||
Revision as of 15:50, 3 September 2024
To be successful in Live for Speed it is vital to familiarise with the cockpit gauges and on screen information. The gauges can be set up to your liking via the display menu in the options. Using ⇧ Shift + F you can switch off all on screen information at once.
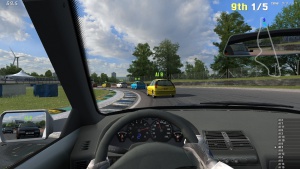
On-Screen
The track map: On the track map you can see your and your opponent's position.
 Green: Your own car
 Bright Yellow: Human opponent in front of you
 Pale Yellow: Human opponent at least one lap in front of you
 Orange: Human opponent behind you
 Dark Orange: Human opponent at least one lap behind you
 Light Blue: AI opponent in front of you
 Dark Blue: AI opponent behind you
Note: The colours are configurable, but the above colours shown are the default colours.
Frame rate display: The frame rate display shows how many frames per second are being drawn. This rate should never drop below 30 as the movement will start to be jerky. You can improve your FPS rate by tuning down the graphics details a bit.
Position: The yellow number on the left shows your position in the race. This will appear incorrectly if people finish the race ahead of you and spectate (⇧ Shift + S) or pit (⇧ Shift + P). Do not be fooled if you suddenly jump up a few positions on your last lap. The position indicator will turn orange (default) when the race is finished.
Laps: 2/5 shows that you are in the second lap of a five lap race. During practice and qualifying only one number is displayed which shows how many laps you have driven. The laps indicator will display orange (default) when the session is finished. IMPORTANT: In a timed race, the counter will change colour when the timer reaches its end. However, the race is not finished until the leader has crossed the finishing line after the counter has reached its end. In a timed race, if you cross the line and the 'xxx has won the race' has already been displayed, the session is over. In qualifying, if you are on a hot lap when the timer runs out, your lap will still count if you finish it.
Total: The total duration of the race.
Qualify: Only displayed in qualifying session this shows the time remaining to qualify. When the time runs out the text will be coloured orange. The lap which you are on will be the last one being timed.
Best: The fastest lap you did during this session since you last left the pits.
Lap: The current lap time. Will be started and stopped at the Start/Finish-Line.
Split: The last split that was timed.
Pedal bars:
- Green: Throttle - This is the throttle butterfly position, and not the throttle pedal position, though most of the time they correspond.
- Red: Brakes - This is the brake pedal position, and is proportional to brake system pressure.
- Blue: Clutch - This is the clutch pedal position, but Autoclutch can cause the bar to move seperate to your pedal or button. In vehicles with an electric motor, the blue bar shows the charge/discharge power.
- Horizontal: Force feedback strength - a yellow bar shows the left/right strength of the force feedback sent to the wheel controller. If the bar turns red, the force is maxed out and is clipping - it is advised to turn down the force feedback strength by pressing the , key or in control options.
Steering: In the external view a red dot indicates how far the steering wheel has been turned.
Cockpit
Tachometer: The left gauge in the cockpit shows the current revolutions per minute. In race cars, there is a red shift indicator light which will light up when shifting up or down would increase the power output of the engine.
Gear Indicator: The gear you are currently in.
Speedometer: The speed in mph or km/h. It's displayed as analogue gauge in road cars or in digital numbers in race cars.
Turbo pressure gauge: Cars with a turbocharged engine have a gauge which shows the intake air pressure. When this pressure drops the engine has less power.
Oil temperature gauge: The current Oil temperature. If the cooler has been damaged in a crash the engine temperature will rise and the driver should take care not to push too hard because this might destroy the engine. This is not enabled yet. It may also be Water Temperature, but the same principles above will apply.
Oil pressure gauge: The oil pressure. This is pretty similar to tachometer. You can see this gauge in LX cars and RaceAbout.
Fuel gauge: The remaining amount of fuel. Take care to pit in time or you will run out off fuel. A digital reading of the amount of fuel in your tank can be seen in the F12 menu.
Clock: Some cars have a clock which shows the local time set up in Windows.
FPS: Some cars have a gauge that shows the current FPS that Live for Speed is running at. This was added mostly to fill empty space on the console in some cars.
Dashboard lights
| Some cars use circular light indicators instead of symbols. |
| Light | Meaning | Description |
|---|---|---|
| Sidelights | A symbol with two green lights indicates that the car's sidelights are on. | |
| Low beam | A green dipped light symbol indicates that the car's low beam is on. | |
| High beam | A blue light symbol indicates that the car's high beam is on. | |
| Indicators | A left/right green arrow if the indicator or the hazard warning lights are turned on. | |
| Front fog | A green fog light symbol indicates that the front fog light is on. | |
| Rear fog | A yellow fog light symbol indicates that the rear fog light is on. | |
| Traction control | In cars that have traction control, a currently engaging TC is indicated by a rapidly flashing TC symbol in road cars or a yellow light. If TC is disabled, the indicator will be constantly shown as a warning that TC is off. | |
| ABS | In cars equipped with Anti-Lock Braking System (ABS) a yellow ABS symbol will flash when the system is engaged. If ABS is disabled, the ABS symbol will be constantly shown. | |
| Low fuel | Shown when there is less than 5% of fuel left in the tank. This light is available only in cars with an internal combustion engine. | |
| Handbrake | If the handbrake is engaged it will be indicated by a red exclamation symbol in a circle in road cars, or a red light in race cars. | |
| Shift light | Shown when it is the optimal time to shift up to a higher gear. This light is available only in cars with an internal combustion engine. | |
| Engine damage | Shown when the engine power is reduced due to over-revving the engine. If the engine damage is lower than 3%, this light is shown in yellow color. Higher engine damage results in a red light. This light is available only in cars with an internal combustion engine. | |
| Oil pressure | Shown when the engine is stalled. Oil pressure is not simulated in LFS. This light is available only in cars with an internal combustion engine. | |
| Battery | In a car with an internal combustion engine, it is shown when the engine is stalled. In a car with an electric motor, it is shown when there is less than 5% of charge left in the battery. | |
| Pit limiter | In cars that are equipped with a pit lane speed limiter, when the limiter is engaged it is indicated by a green light. | |
| Neutral | Shown when the car is in neutral gear. This light is available only in cars with an internal combustion engine. |
Additional On Screen Displays
F9, F10, F11, F12
Using the F9-F12 keys, you can switch through the four on-screen displays for tyre temperature/wear & clutch temperature, damage, live settings and pit strategy. Press the button again to turn off the display.
Tyre temperature/wear & clutch temperature (F9)
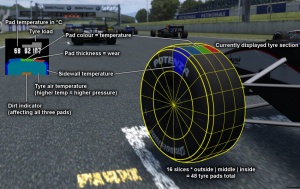
The F9 display shows four small windows each containing a 2D profile of a tyre, some numbers and three grey bars.
There are six areas in the diagram - three contact patches, the sidewalls and the air temperature. Each area goes from dark blue (cold) through green (ideal) and into red (overheated). There is also black, but that is only shown inside the tire after a blowout or puncture. Above the tyre diagram, there is a set of three numbers, which give the exact temperature of that tyre part. However, these numbers only represent the average temperature of the whole contact patch (from the inside up to the surface) - if you press and hold Ctrl + ⇧ Shift, you can see the the actual surface temperature, which rises and falls much more quickly during a race. Bear in mind that since the tyre diagram only shows the top section of the corresponding tyre, a 'flat spot' on a spinning wheel is represented by little flashes of red.
If the tyre diagram changes its colour to orange, it means that ABS is active and is preventing the wheel to lock.
At the top of each window there is a set of moving grey bars showing the footprint pressure of the tyre on the road. The display gives a good idea of how much camber (lean) the wheels have at any given point in time. With most cars there is a change in camber when the body rolls in a corner, but in order to find the most grip the wheel needs to be upright (relative to the road surface), when the bars are level the wheel is vertical to the road.
Last but not least we have a little brown bar that appears inside the tyre diagram, this brown bar refers to the amount of dirt on the tyres. Dirt reduces grip by a huge amount and therefore you should be more careful after a even a tiny 'off' - it can take a few corners to clean your tyres up again.
The F9 display also shows a small bar labelelled "CT" and an engine icon. The former indicates the temperature of the clutch. Initially, the bar is orange, but then turns to red as the clutch temperature increases. The latter indicates the engine health (initially it's 100%, but you can degrade engine performance by over-revving the engine). On the right, you can see the accelerometer and a panel for showing estimated laps given current fuel use is displayed (this only appears after you have completed a lap, in order to measure actual fuel usage).
Damage display (F10)
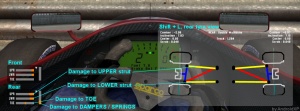
The damage display shows you if a part of your suspension is damaged. An orange bar symbolises the damage. The longer the orange bar, the more damaged your suspension is. A red bar means that a part of your suspension has completely collapsed - But probably you will already have noticed this by the behaviour of the car.
UPR: Represents damage to the upper strut. This essentially means the upper suspension arm is bent/shorter, thus decreasing your camber (more negative).
LWR: Is damage to the lower strut, increasing your camber (more positive).
TOE: Shows damage to your toe in/out setting. The orange bar illustrates in which direction the front of the corresponding tyre is pointing to. If the orange bar on the left suspension damage display points to the right, then you have more toe in, if it points to the left, you have more toe out. Vice versa for the right suspension damage display.
Spring/Damper damage: Shows how intact your damping is. If the bars become red, the damping failed completely, which you will immediately notice because your car will be jumping all over the place.
Also in this display, similarly to F9, four smaller optional panels are displayed (CT, engine health, accelerometer and estimated laps given fuel use).
Live settings (F11)
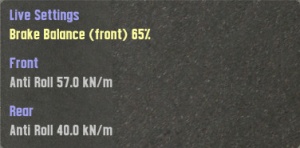
This display allows for some on-the-fly changes to your current car setup. Included are brake balance and front/rear anti-roll bars.
You can change the settings by using the arrow keys: use ↑ / ↓ to highlight the setting you want to change (row turns yellow), and then use ← / → to decrease or increase the value. On change, row turns red and then gets applied when it's yellow again. Of course, you can also bind commands to wheel buttons in order to change these values during races, which is much more convenient than fiddling around with F-buttons and arrows. See the Script Guide.
Note: The changes made on this display are applied (almost) immediately! So better don't fool around with the brake balance when approaching that tricky hairpin. Furthermore, not all cars can adjust all three settings. The RaceAbout, for example, has no rear anti-roll bar.
Handicaps (if any) are also shown on this screen, for informative purposes (can't be changed on-the-fly).
Pit instructions (F12)
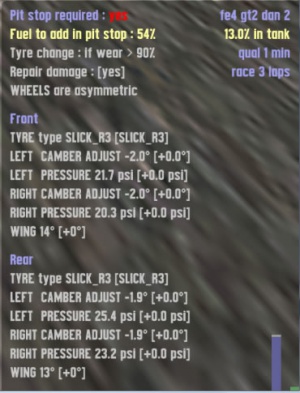
On the pit instructions display, you can set up what actions should be taken while doing a pitstop. Additionally, there is a fuel display and other generic information, for example if a pitstop is required (by racing rules) or not. At the top right corner, the name of the setup you are using is displayed.
You can change the settings similarly to the F11 menu, by using the arrow keys: use ↑ / ↓ to highlight the setting you want to change (row turns yellow), and then use ← / → to decrease, increase or change the value. Requested setup changes stay red until the changes are applied during a pitstop. You can cancel all planned changes by highlighting row "Setup changes requested [cancel]" and pressing ↵ Enter.
The values displayed in the square brackets [] indicate the difference to the current setting. For example, if you currently have 5° front wing and change it to 8°, the bracketed value will read [+3°]. As soon as you do your pitstop, the changes will be applied and the value reset to [+0°]. For most setup changes, you will need to repair any damage you have incurred before the pitstop for the changes to be applied. This will happen automatically. For this reason you should take into account whether your damage will delay your pistop for long enough to cancel out the speed you will gain by changing your setup.
The change instructions include:
Fuel to add at Pit Stop: Sets the amount of fuel that will be added in the pitstop. This ranges from 0% to 100% and will fill the tank to a maximum of 100%.
Tyre change if wear > X%: Sets the amount of how much a tyre must be worn before it will be changed. If you set it to 10%, then even a slightly worn tyre will be changed, if set to 90% the tyre must have almost no tread left before it gets replaced. LFS will only replace the tyres that fit this criteria. You will need to be careful that some tyres on your car may not be changed if you have set this percentage incorrectly. If this is set to 'always', all of the tyres will be changed regardless of wear.
Repair Damage: Boolean field. [Yes] will repair all damage, [No] will repair none.
Wheels are symmetric/asymmetric: Defines wether you want to edit the front/rear wheels in a symmetric fashion or not. If you choose asymmetric, you can also edit the left/right side independendly.
Tyre type: Change this if you want to mount a different type of tyres. See tyre types for more information.
Camber adjust: See camber adjust.
Pressure: Sets the tyre pressure.
Wing: (only on cars with downforce) Sets the angle of your wings. See downforce.
Please note that depending on the car you drive, some of the options seen on the screenshot might not be available. For example, on non-downforce cars, there is of course no wing adjustment.
G-Forces
At the bottom of the screen right in the middle you will see figures showing the actual lateral and longitudinal acceleration. Lateral acceleration is on the left and a small triangle shows if the acceleration is to the left or the right side. The longitudinal acceleration is on the right side and a triangle shows the direction of the acceleration here too.
Race position list
Shows your position in the race as well as the position of your opponents. At the end of each sector the gap between you and your opponents will be displayed. Clicking on a driver’s name will change the camera to that driver.
Suspension (Shift + L)
Pressing the ⇧ Shift + L combination will bring the suspension display to the screen. This is a schematic diagram of the car's suspension which is updated in real time so you can view the suspension work through corners and over bumps. This display will also reflect if your car uses a Double Wishbone, Mac Pherson or Trailing Arm suspension.
Latency/Lag bars
They display the amount of latency between you, other players and the server.
Technical: The blue and yellow bars represent the round trip ping from the server to the guest and back again, in the TCP game packet system. So, it’s the total of the time taken for a TCP packet from the host to be sent to the guest, and the reply to be sent back to the host. The yellow bar represents your own ping.
The green bar (which moves quickly) represents the number of "game packets" that have been already sent but have not been "used".
How to read the coloured bars:
- all bars are barely visible / are very low, green bar is moving quickly - everything is OK
- one blue bar is going up and changes its colour to red – a player is lagging
- the yellow bar going up - you are lagging
- extreme of (2) that player will time out.
- extreme of (3) you will time out.
⇧ Shift + F8 toggles network debug mode.
Connection List
This screen is shown by pressing N, which will alternate between names over cars, no names over cars, and the connections list. It shows who is connected to the server, what control system they are using, allows you to send and receive setups, and perform driver changes in the pitlane.
Ping info: The numbers next to player names represent their ping times in milliseconds when the ping is lower than 1 second, otherwise it shows the time passed from last packet received in seconds. It’s bascially the same info as you can see in the lag bars at the bottom left of your screen.
At the top, there is a button saying either UDP or TCP. By clicking that button, you can switch between those two ways of packet sending system. UDP is often quicker but not as reliable as TCP.
Controller Type: The letters W, M, Kn and Ks are used. W means wheel, M means mouse, Kn means Keyboard Normal and Ks means Keyboard Stabilised (where the computer will attempt to provide mild steering assistance in some circumstances). This display corresponds to the setting in LFS on the other driver's computers. It is possible for a mouse user to use the wheel/joystick setting, so this display cannot be considered definite fact.
Clicking on the controller type next to a driver's name will switch the view focus to that driver.
Holding the key combination Ctrl + ⇧ Shift reveals usernames of the players in the list.
