Difference between revisions of "LFS Editor/Guides"
m (→Saving a model) |
|||
| Line 201: | Line 201: | ||
== Saving a model == | == Saving a model == | ||
| + | |||
| + | The buttons for saving an object or a subobject are located in the bottom left corner of the screen. | ||
| + | |||
| + | [[image:Modeller load and save objects.jpg]] | ||
| + | |||
| + | For more information about this button cluster, refer to [[Modeller#Load .2F save object|Load / save object]]. | ||
=== Saving a standalone object === | === Saving a standalone object === | ||
Revision as of 07:16, 18 August 2022
| Vehicle Mods | |
|---|---|
| Vehicle Mods at LFS.net |
This page contains guides for the LFS Editor.
Video tutorials
Official tutorials
by Scawen
- LFS Mods Introduction (11:49)
- LFS Modeller Overview (3:30)
- View Controls Overview (3:40)
- Updating a mod with a new version (4:06)
- Building the Brickmobile: Part 1 - Model (11:58)
- Exporting from Blender to LFS Editor (3:01)
- Building the Brickmobile: Part 2 - Texturing (9:24)
- Building the Brickmobile: Part 3 - First Drive (5:07)
- LFS Steering Animation Editor (12:09)
- Building the Brickmobile: Part 4 - Level of detail (LOD) meshes (5:43)
- Building the Brickmobile: Part 5 - Masses and object positions (5:22)
- Bike Steering & Suspension (13:19)
- Wheel rims in the LFS Editor (10:00)
Community-made tutorials
by AHPP
by Jake_Blasted
- LFS Editor HOW-TO guide 1 (47:26)
- Texturing & Clock Mapping (6:19)
- Custom Configurations (3:27)
- Suspension Types & Suspension Tuning (19:41)
- Aerodynamics (12:47)
- Driver & Dash Adjustment (3:55)
by Arcee
- How to make skin map (4:24)
by mechadoodle
- 1:1 Skin Mapping Tutorial (11:44)
General editor guides
Setting up suspension for bikes
Rear suspension
The "trailing arm" suspension type is recommended for the rear suspension. You create a "trailing arm" object with its object centre at the pivot point for the rear suspension. That must correspond with a "lower pivot" point in the vehicle editor.
Front suspension
In the modeller:
1) Adjust the "steering wheel" (handlebar) object so that the rotation point is aligned with the top bolt - the centre of the top bolt should have x=0 and y=0.
After the "steering wheel" is in the right place, then back in the vehicle editor:
2) Increase the "Trail Reduction" in the Steering / Driver section to match the offset between the stanchions and the steering axis. As you do that, the wheel moves forward. So then you reduce the "Forward" value in "Suspension" section by the same amount to compensate. By trial and error you can end up with the steering axis line going straight through the centre of the bolt, then the steering should work correctly.
Vehicle editor guides
This section contains guides for the LFS Vehicle Editor features.
Adjusting masses
Press S for 'special draw' in the vehicle editor. You can see the positions of various masses (e.g. engine / fuel tank). You can adjust their positions in the Object Positions section. Also you can edit the 'frame' which is only for mass distribution. Frame elements should be placed around the vehicle, as an approximation of where mass would be. You can get the desired mass and weight distribution by adjusting positions of the cuboid masses and the frame elements.
To create a frame element, you first add points then add a frame element between those points. Click new point then use the drag handles to move the point where you want it to be. With a point selected you can click dup pt to duplicate that point. The new point is in the same place as the point you duplicated, so make sure you move it away. To connect two points with a frame element, clicking to select one point, then hold down ⇧ Shift and click the second point. A frame element should appear and you can change its mass by adjusting the TUBE mass per metre slider bar.
After constructing a frame you may with to increase or decrease the mass of the frame, without adjusting each element individually. In the Mass section, you can see the frame's mass at the top of the list of masses. See plus and minus buttons beside Scale Frame Mass.
- LMB - big steps
- RMB - smaller steps
- Ctrl + RMB - even smaller steps
Setting suspension types
To set double wishbone suspension you will need a thrust bearing, and upper and lower pivot. These are points on the car body, created in the vehicle editor in the same way as 'frame' points then set to the appropriate type.
- Press S for 'Special Draw'
- Click new point (near the top right)
- Position this point somewhere inboard of the lower part of the front suspension
- Adjust POINT type to 'lower pivot'
- Deselect that point by clicking on it
- Repeat steps 2 to 5 to create an 'upper pivot' somewhere above the lower pivot
- Repeat steps 2 to 5 to create a 'thrust bearing' somewhere above the pivot points
- Now you can set the type to Double Wishbone (in the Suspension tab at top left)
For single seaters you will probably want to add additional points and tubes so you form a 'wishbone' shape instead of a single rod connecting the suspension to the car.
For examples you can have a look at the existing Formula cars.
After setting up the suspension, press ⇧ Shift + L to see a diagram of the suspension geometry and press space to see how it reacts when the car is dropped. You can also switch on the Zero Springs Test in Suspension tab (at the top left) to see how the car falls down to the bump stops. This can help you to observe the way the camber changes according to the suspension geometry.
Adjusting aerodynamics
In the Aerodynamics section, the sliders set the downforce values for a theoretical speed of 1 m/s, for a wing at the maximum angle of attack 30 degrees. These values are related to the square of speed, so at 10 m/s the downforce and drag values will be far higher than the theoretical values. You can see a representation of the downforce and drag at various speeds in the Downforce tab at the bottom right of the screen.
- Hide the bottom right editor buttons by clicking the − button in bottom right corner
- Select the Downforce tab of the default setup
- Adjust the Test speed to see how much force you will get with the default wing settings
NOTE: The downforce and drag forces are applied at the locations of the aerodynamic subobjects of the model. In the modeller, in 'subob' mode, these subobjects are shown in blue and have a letter code indicating their subobject type:
- R - rear wing
- F - front wing
- U - undertray
- C - aero centre
Simple optimisations
Concealed Wheels (in Wheel Object section) - Please use this option if the inside of your wheels is fully concealed (e.g. most road cars). The most obvious difference is that the tyre manufacturer logo will not be drawn on the inside of the wheel. Also the spokes may not be drawn when the wheel is seen from the hidden side. A case where you would not use this option: single seater racing car.
Concealed Driver (in Wheel Object section) - Please use this option if the driver's body is not usually visible. This is the case for most cars (e.g. road cars and single seaters) and can help the frame rate when there are a few cars around. The helmet will be drawn in any case but the driver's body will not be drawn if the viewer is firther away. Some cases where you would not use this option: karts or motorbikes.
Driver animations
In the animation editor you can edit the sit and steer animations. Press A in the vehicle editor to enter the animation editor. Buttons to save and load animations are at the top left. Driver animations are named str_xxx and passenger animations (which have a single frame) are named sit_xxx. The 'xxx' part of the name is up to 7 characters and can be set in the Driver section in the vehicle editor.
To edit a steering animation: (LMB = left mouse button)
- Enter animation editor by pressing A in the vehicle editor
- Note the buttons show skeleton and show object at bottom right
- Select an individual frame on the timeline at bottom left
- Select any bone you want to move or rotate (switch show skeleton on and show object off to make this clearer)
- Hold Q/W/E for x/y/z rotation - rotate by dragging left or right with LMB
- Hold A/S/D for x/y/z movement - drag with LMB in relevant direction
- Check for smooth movement by moving the timeline slider
- Click SAVE as STR to save the file (in your data\move folder)
NOTE: The steering animation should contain very little head movement and rotation. The game automatically applies head rotation and lean in real time for steering and lateral force.
Editing dashboard
In the dashboard editor you can edit the positions of various parts of the dashboard, or switch some gauges or lights on or off. In the vehicle editor open the Textures tab. Beside the word CLOCKS you can click to select the dashboard type. This strange looking name, e.g. "s_clock_formula" is actually a specially named live texture that you can enter in 'page' mode in the modeller, as a texture page either for the main object or a subobject. To edit the selected dashboard, click the EDIT button. It is a good idea to switch off any lights or gauges you don't need.
Collaboration - More than one person working on a mod
There is a feature to help with sharing a complete mod with its development files. Unlike exporting for upload, this function copies png files rather than creating dds textures. It doesn't automatically create a zip. It simply gathers all the files and saves them in a structured share folder ready for copying.
After creating the initial vehicle and working on it a bit, you can click export to share vehicle for development at the top right.
That exports veh, engine sound, animations, png in a directory structure in a 'share' folder. So you can zip up those folders inside 'share', send it to your collaborator who will unzip it to 'data' on their computer. Now the exact same mod exists on both computers.
From that point on, if only the collaborator works on it they could do the same to return the updated mod back to you. But if you both continue to work on the project at the same time you will probably manually share updated files.
Two people should usually not work on the actual vehicle editor settings at the same time, as you would need to manually merge the changes. It may be that one person works on the vehicle settings, while another works on the 3D model. The 3D model can be saved out from the modeller and sent to be loaded in on the remote computer. A complete wheel style file can also be saved or loaded - LOAD WHL / SAVE WHL in the wheel object section. Engine can also be saved separately.
There is also a function export for DV in the Textures section. This copies all png textures to data\png_export. For example the person working on the 3d model might save the 3D model into data\3dob and do a png export then send those files to the person working on the veh. The veh person would then save the png files into data\png load the model (in the modeller, accessed from the vehicle editor).
Modeller guides
This section contains guides for the Modeller features.
Loading a model
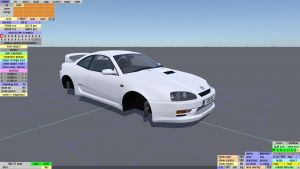
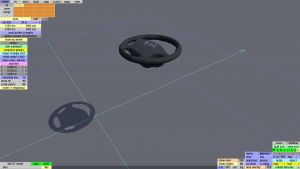
You can load either an existing object made in the LFS Editor, or an external model in OBJ format.
The button for loading a model is located in the bottom left corner of the screen.
For more information about this button cluster, refer to Load / save object.
Loading an existing vehicle made in LFS editor
An existing vehicle model can be loaded into the Modeller by loading a vehicle in the Vehicle Editor and switching to the Modeller:
- Open the Vehicle Editor
- Load a vehicle by pressing the LOAD button and select it from the list
- Press Esc or click E - Edit Model in the bottom right part of the screen
To go back from the Modeller to the Vehicle Editor, press Esc - the changes done in the modeller will be carried over automatically, there is no need to save it explicitly.
Loading an object saved in LFS editor
To load a standalone object saved from the Modeller or the Vehicle Editor,
- Enter the Modeller in a standalone mode from the LFS editor entry screen
- Click the LOAD button at the bottom left of the screen.
Such object can be the main object (car body) or a subobject, like a steering wheel.
Loading an external 3D model
If you have a 3D model in OBJ format that you want to import into the Modeller, you can load it by clicking the OBJ button at the bottom left of the screen. The file must be located in the 'data\obj' directory and must have a '.obj' extension.
The OBJ file must be exported properly to be useable in the LFS editor.
How to export from Blender:
Scale
LFS uses metres for units. If you use another unit, please export using an appropriate scale.
Position
Your model should be approximately centred over the origin and ideally the body should sit on the ground (without the correct ride height).
Backface culling
Live for Speed uses single sided triangles. While modelling in blender and before exporting, make sure you look at your model with back face culling enabled so you can be sure the surfaces are facing the right way.
Export Settings - Export OBJ file
Transform:
- Y forward / Z up (so the model is oriented correctly in LFS)
Geometry:
- Write normals (so LFS can work out smoothing groups)
- Triangulate faces (as LFS geometry is based on triangles)
Common errors when importing a model in LFS Editor
Vertex X is out of bounds - One of the vertices is more than 1024 metres away from the origin. This could be a problem of wrong scaling. LFS uses metres for units.
Too many vertices - The number of vertices exceeded the maximum limit of 32768 for OBJ import. Note that when importing a model into the LFS editor, it is possible to import only one half of the model and then use the mirror function to mirror the triangles to the other side automatically. The total limit of vertices or triangles is 65536.
Warning about licenses
If you are using a file made by someone else as part of your model, even if you modify it, you will need to declare this when you upload your mod.
You will need to specify the license that the original creator applied to the model and provide information such as the name of the creator and a link to a website where the license information is displayed.
If no license is stated, by you or the original creator, you cannot upload the mod!
Some licenses do not allow you to create work by changing the model you downloaded.
Please check that the supplied license allows you to distribute modified versions of the original model.
Saving a model
The buttons for saving an object or a subobject are located in the bottom left corner of the screen.
For more information about this button cluster, refer to Load / save object.
Saving a standalone object
To save a model as a standalone object, click the SAVE button at the bottom left of the screen. The object will be saved into the 'data\3dob' folder, which can be loaded again through the modeller or Vehicle Editor.
If you have entered the modeller through the Vehicle Editor, there is no need to save the model explicitly. You can go back to the vehicle editor by pressing the Esc key.
Background images
You can load background images to help with modelling.
- Save a square png image (probably 1024x1024 or 2048x2048) in your data\bkg folder
- Go into a 2D view (R/F/V etc.)
- At the bottom right click load bkg to load your image
- Click adjust then use the mouse to adjust the position and size
- After clicking adjust you can also click bkg scale to type in the scale
- Repeat the steps above for any of the other main 2D views
- Then click save scm which saves the whole scheme of adjusted backgrounds so you can easily load it next time
- The "use opposite" option: for example on the left side it will use the right side image and position, automatically flipped
Customisable colours
You can set colours to be adjustable, when a user enters the garage screen and clicks New colours.
This is done by giving some of the mappings a special name. Each mapping has a colour, but sometimes you want several mappings to have the same colour. For example the top and side mappings of a car. You can define a "Main" colour and "Copied" colours. So for example you could set top mapping to be a Main colour, then assign the side, front and rear mappings to be Copied colours of the top. Main colours are identified by the letter M followed by a number, while copied colours are identified by the letter C followed by the same number.
Taking the example above, you could name your mappings (colours) like this:
M1_top
C1_side
C1_front
C1_rear
As soon as you set the names this way, you will notice the C1 colours aren't adjustable in the modeller. You can adjust the M1 colour and all the C1 colours will take the same value. Also this colour is now adjustable by the user, in the settings block. You can see that in the vehicle editor in the Colours section.
You can allow more than one customisable colour group, as seen on some of the LFS cars. This is done by creating M2 / C2 colours, up to a maximum of 4 customisable colours.
Note 1: You can use copied colours without them being adjustable by users. Use higher values than 4. E.g. M5_original and C5_copy.
Note 2: Customisable colours are also available for subobjects. To use this feature, select the subobject and switch on use custom colours
Advanced 1: You can also create a darker copy of the main colour, by using the prefix 'D' for dark or 'E' for extra dark. This can be useful to fake reduced ambient lighting if you are adding surfaces in a place where there should be less light. For example:
M1_main - the user can set this colour
C1_copy - direct copy of M1_main
D1_dark - darker copy of M1_main
E1_extra - extra dark copy of M1_main
Advanced 2: If you happen to have different configurations on your model and each configuration has its own seperated different mappings and cutouts and you want to assign all of them to a single color slider that will be Colorable by the user, then you should name each configuration with the same Main color name.
For example we have 4 Configurations, the first one have couple of mappings named as such:
M2_Con1 Top
C2_Con1 Back
C2_Con1 Front
C2_Con1 Side R
C2_Con1 Side L
Then the other configurations should have the same names but with a little difference wich is the configuration number such as:
M2_Con2 Top
C2_Con2 Back
.
.
.
etc
This applies to all configurations you may have, this method ensures that whenever a user selects a random configuration, it will have that adjustable color slider.. As sometimes this slider can be missing in one of the cons due to improper naming.
Light colours: headlights, indicators, etc.
All light mappings have a name with prefix l_.
The cutouts for all light mappings must share a single texture page.
The special names for light mappings are:
| Mapping | Description |
|---|---|
| l_brk | brake (main mapping of brake light) |
| l_sbrk | side brake (e.g. side of a curved brake light) |
| l_tbrk | top brake (e.g. top of a curved brake light) |
| l_cbrk | centre brake (e.g. brake light in rear window) |
| l_head | headlight (main headlights) |
| l_side | side light (smaller lights near headlights) |
| l_tail | tail light (red rear lights) |
| l_stail | side tail light (e.g. side of a curved tail light) |
| l_ttail | top tail light (e.g. top of a curved tail light) |
| l_rind | rear indicator |
| l_find | front indicator |
| l_rsind | rear side indicator |
| l_fsind | front side indicator |
| l_rfog | rear fog light |
| l_ffog | front fog light |
| l_rev | reversing light |
Level of detail (LOD) and Shadow / Physics / Collision meshes
When you first start work on a mod, you can test it in LFS with only a single level of detail. That is the main graphical LOD, known as LOD1. But your mod cannot be uploaded to the website like that. It needs at least a physics or collision mesh, and finished mods should usually have a shadow mesh too.
Levels of detail are used to save the graphics card from doing a lot of wasted work when models are far away. For instance, when a model appears only a few pixels across, we do not need to draw that model using thousands of triangles. So levels of detail are important to keep a high frame rate when there are a lot of vehicles in the view.
LOD1 is drawn when the viewpoint is near to the model
LOD2 is drawn in the middle distance
LOD3 is drawn in the far distance
In Live for Speed, LOD2 and LOD3 are not only for graphical level of detail, but also double up as shadow and collision meshes.
There are two possible LOD choices for a mod you upload to the website.
Work in progress / unfinished / test mod - 2 levels of detail
LOD1: Detailed mesh, for close up views
LOD2: Middle distance, shadow mesh and collision box
In this case, the collision mesh doubles as the shadow casting mesh. For most models this approximation is too crude, because the collision mesh is very limited in the number of points and triangles. But it's fine for early testing.
Completed mods usually have 3 levels of detail
LOD1: Detailed mesh, for close up views
LOD2: Middle detail mesh, for middle distance - also used for soft shadow
LOD3: Low detail mesh, for distant views - also used for collision box
In this case, LOD2 is drawn when the mod is in the middle distance. This saves the graphics card doing a lot of work drawing detail that you can't see and helps with frame rate. This LOD should be a good representation of the shape of your mod, so it looks good in the distance, and casts a good looking shadow. LOD3 is only used as a visual representation when the mod is very far away. Its main purpose is for collisions with other vehicles or when your mod hits a wall or rolls over.
How to add an automatically created physics / collision mesh
- In the modeller, click the + button to the right of lod1 (near the top left) to add a new LOD
- Now select lod2 or lod3 (the newly created, empty LOD)
- Click auto-create collision mesh
The automatically created collision mesh is created based on the size of the existing LOD1 (high detail) mesh. This should provide basic collision physics but you will probably want to improve the shape to make it a better match for your vehicle.
Assigning Multiple Configurations To LOD2
When having 2 or more configurations on your model, you might want to make sure that the shadows will correctly cast the shape of the selected configuration, that's when Configurable LOD2 comes in handy..
When you have done a simplified shape of the configuration that you are happy with, select its traingles and a click on + to lod2 button This will now be your LOD2 of that configuration and by doing so, the ingame shadow will cast a proper shape of each different configuration. Make sure that the configuration triangles in lod2 share the same layer with the main one in lod1
LOD3 (lod3) (Collision Mesh) Can Not be Modified for different Configurations yet, it's unified for the whole model.
Draw order of materials
You can see a material list in the vehicle editor Textures tab. That should represent the draw order of the materials.
To actually change the draw order of the materials, you adjust the draw order of the cutouts in the modeller. The draw order is assigned by the order the materials are first encountered in the cutout list. The material's index is the number on the right of the 'material' column in the list of cutouts.
The idea is to make sure the material for the steel frame appears in the cutout list before the material for the cloth cover. For example if you selected a material with material index '2' and move it to the top of the list, then on reaching the top, it should acquire material index '1'. What was material 1 will become material 2.
Draw order of individual triangles
Within materials, triangles are drawn in the order they appear in the internal list of triangles. LFS doesn't give you direct control over this list, but you can improve the draw order by clicking magic triangle sort. This function tries to adjust the draw order so that further away triangles are likely to be drawn first. This may be better than randomly ordered triangles, and may help with "Z fight" problems if the nearby surfaces share a material so you can't manually correct the draw order by ordering the materials.
Creating a skin texture
NOTE: If you don't know how to apply textures to a car in the modeller, you can follow this video tutorial about texturing.
A skin is a special texture designed to cover the paintwork of your vehicle so that other people can create their own custom paint jobs. The idea is to uniquely cover the whole paint surface of the vehicle without any part of the texture being used more than once. As a mod creator you may take on the task of creating a default skin that people can modify to use when driving your mod. Here are a few tips for designing skins.
Things needed
- a skin file located in data\skins folder, with a name like ABC123_NAME.jpg
- a page of type "skin" called ABC123_NAME where ABC123 is the Skin ID of your mod and NAME is a name for the skin texture
- multiple cutouts using that skin page, usually for each view of the car (left, right, front, back, top) - this may vary depending on the shape complexity of the car
- mappings using those cutouts and assigned to the respective triangles of the model
- the skin must be assigned to a car colour in Vehicle Editor - Colours tab
Tips
- A skin must be created as 1024 or 2048 square image. It can be a blank image for start. To load it into LFS it must be saved as a JPG in your data\skins folder, with a name like ABC123_NAME.jpg where ABC123 is the Skin ID of your mod and NAME is a name for the texture (usually DEFAULT for a plain texture). To use a skin in the editor, there must be a page of type "skin" named after the skin file in data\skins.
- The artists who create custom skins prefer everything lined up as well as possible, so try to use the options link with SIDE / link with FRONT / link with BACK / link with TOP for the main mappings, so your mappings have the correct width.
- You can type in the height of the mapping, to make sure front, back, side mappings have the same height (right click on a value to edit it manually). You can also type in the right, front, up values.
- Try to keep the pixels of your mappings fairly square (cutout has a similar aspect ratio to the mapping). The squarer they are, the easier for your skin artists.
- Not *everything* needs to be skinned from a proper direction. E.g. skin artists may be quite happy with a single mapping for a wing mirror, probably from the front, that goes right through the object (so the side and top surfaces are not individually mapped). Smaller mappings don't 'link' with any other mapping.
- Skins on models with complex shapes may have the added complication of overlapped areas. So you should plan this in advance, where you want the MAIN top, front, side, back mappings and allow enough space for the overlapped areas to be mapped separately. You may wish to follow the general idea of one of our default skins, and change it to suit your needs.
Generating a skin template
Once you have all mappings in place, there is a function to generate a skin template for your car. It takes the correct size screenshot of all assigned mappings for the skin texture, and copies that to the clipboard so you can paste it into your work-in-progress skin in your 2D graphics software.
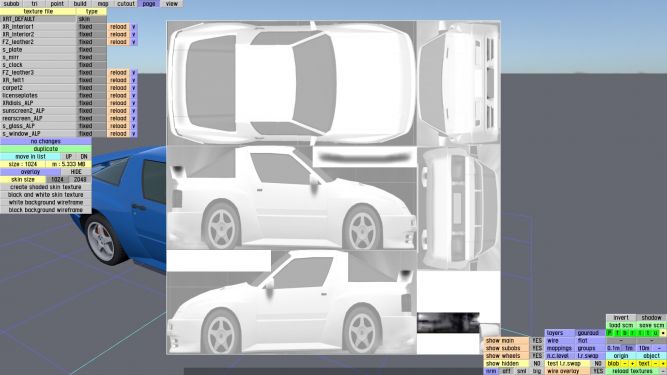
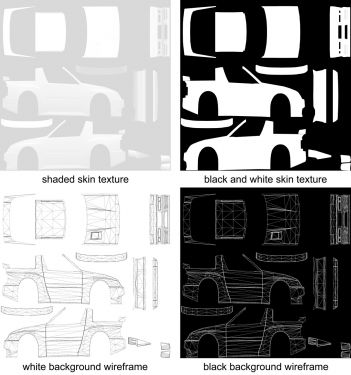
Go to 'page' mode, click the skin texture page and you will see multiple buttons for exporting a skin texture:
- create shaded skin texture - this texture is cut out exactly around the outer edges of the model, which may result in unwanted visible seams when the skin is applied on the car.
- black and white skin texture - this includes some overlaps to eliminate seams around the edges of the mappings.
- white background wireframe
- black background wireframe
Extrude and Lathe functions
To use the extrude or lathe functions, first you select a series of points in order to create a cross section that you will either extrude linearly (extrude) or rotate around a point (lathe).
You can see the cross section by enabling the trace option in point mode, then selecting points in the correct order.
The trace function has two modes:
- incl - include the last selected point
- excl - don't include the last selected point
It can sometimes be confusing which order to select the points, and then choose 'inside' or 'outside' to get the desired effect.
Extrusion
- Put your viewpoint on the side so that you will pull the extrusion towards you
- Select the trace points in anti-clockwise direction as seen from that point
- Create extrusion by clicking extrude (and select outside, inside, etc.)
- Pull the points towards you
Then you should find that your inside / outside request is respected.
Lathe
- Put your view on the side where the lathe operation will initially head towards (at the start of the curve)
- Select the trace points in anti-clockwise direction as seen from that point
- Rotation will take place around the last point you select (which may or may not be included as part of the cross-section)
- Go to 2D view and create lathe object by clicking lathe (and select outside, inside, etc.)
Moving parts of a model to a different model
This is done by saving a subobject from one mesh and loading that subobject into another mesh. In 'subob' mode, with a subobject selected, you can see light green load and save buttons beside the word subobject at the bottom left. These will load and save subobjects with the extension '.sre' in the folder data\3dob.
But what if the parts you want to move are not part of a subobject? In this case you can use the 'break off' and 'merge' functions.
- Create a new empty subobject
- Select the triangles in the main object that you want to move to another object
- Click the break off button
- The triangles (and mappings) are moved into the new subobject
- Save the subobject
- Load the mesh where you want to add the subobject
- Add a new, empty subobject to that mesh
- Load the saved subobject into your new empty subobject and move it to the right position
- Optionally, click merge into main to merge the new subobject into the main object
