Difference between revisions of "LFS Editor/User Interface"
m (→View navigation: add tips) |
m (→Rotate: heading & pitch view buttons) |
||
| Line 87: | Line 87: | ||
* rotate 5 degrees - {{Key press|SHIFT}} +{{Key press|UP}} / {{Key press|DOWN}} / {{Key press|LEFT}} / {{Key press|RIGHT}} | * rotate 5 degrees - {{Key press|SHIFT}} +{{Key press|UP}} / {{Key press|DOWN}} / {{Key press|LEFT}} / {{Key press|RIGHT}} | ||
* rotate 30 degrees - {{Key press|CTRL|SHIFT}} + {{Key press|UP}} / {{Key press|DOWN}} / {{Key press|LEFT}} / {{Key press|RIGHT}} | * rotate 30 degrees - {{Key press|CTRL|SHIFT}} + {{Key press|UP}} / {{Key press|DOWN}} / {{Key press|LEFT}} / {{Key press|RIGHT}} | ||
| + | |||
| + | When a 2D view is selected, two extra buttons appear below the viewport selection buttons. Example for right view: | ||
| + | |||
| + | * {{old button|h : 90.00}} - adjust the pitch of the 2D view (up/down) | ||
| + | * {{old button|p : 0.00}} - adjust the heading of the 2D view (left/right) | ||
=== Field of view (zoom) === | === Field of view (zoom) === | ||
Revision as of 13:12, 22 October 2022
| This page or section is being initially created, or is in the process of an expansion or major restructuring. You are welcome to assist in its construction by editing it. |
| Vehicle Mods | |
|---|---|
| Vehicle Mods at LFS.net |
Interface controls
Sliders
- While dragging a slider bar, you can click the RMB to cancel the drag (restore original value)
- Click the RMB on a slider bar to type in an exact value
- Ctrl + RMB on a slider bar to copy its value
- ⇧ Shift + RMB on a slider bar to paste a copied value
Interface settings
Text and button sizes
The sizes of the interface buttons can be adjusted by using these buttons:
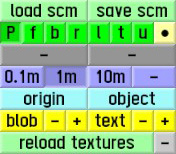
- blob−+ - adjust the size of the point selection buttons
- text−+ - adjust the font size of all editor text
Show/hide bottom right buttons
Sometimes, the bottom right buttons can get in the way of other interface controls or the vehicle model. You can temporarily hide the buttons by clicking the − button in the bottom right corner. The toggle button will change to +, which will make the buttons appear again.
View controls
Buttons for view controls are located in the bottom right corner of the editor.
Viewports
You can switch between different views by clicking the green buttons or by pressing the respective keys on your keyboard. For example, pressing F will switch to the front 2D view.
| P | perspective 3D view |
| f | front 2D view |
| b | back 2D view |
| r | right 2D view |
| l | left 2D view |
| t | top 2D view |
| u | underside 2D view |
Pan
Panning moves the view up, down, left and right. Hold LMB to move the view around a point.
You can also use the arrow keys. Press ↑ / ↓ to pan the view forwards/backwards, or ← / → to pan the view left/right.
Look around
Hold RMB to look around from the current viewpoint.
| You can change the behaviour of the view movement in Options - Editor. |
Move in/out
Moves the camera forwards and backwards. Use the MMB to move in/out of a point.
Double clicking LMB will move the view in to a point by a step.
Orbit
Rotate the view around the point of interest. Hold LMB + RMB or MMB to rotate around a point.
| You can change the behaviour of the view movement in Options - Editor. |
Rotate
In 2D views, you can rotate the view by using the following keys:
- rotate 1 degree - Ctrl + ↑ / ↓ / ← / →
- rotate 5 degrees - ⇧ Shift +↑ / ↓ / ← / →
- rotate 30 degrees - Ctrl + ⇧ Shift + ↑ / ↓ / ← / →
When a 2D view is selected, two extra buttons appear below the viewport selection buttons. Example for right view:
- h : 90.00 - adjust the pitch of the 2D view (up/down)
- p : 0.00 - adjust the heading of the 2D view (left/right)
Field of view (zoom)
You can adjust the field of view of the 3D view by pressing the ● next to the viewport buttons and entering a value in degrees.
This setting can also be found in Options - Editor as Editor FOV.
Sun position
Pressing Ctrl + LMB and dragging the mouse to the left or right will change the sun position.
Pressing Ctrl + LMB and dragging the mouse up or down will change the time of day.
Grid
The grid is a visual aid representing the units of measurement within the editor. It consists of minor and a major grid lines. The minor grid lines are blue, while the major lines are turquoise.
To help figure out where the front of the car should be facing, one of the major grid lines has an arrow pointing in the forward direction.
You can adjust the scale of the grid by pressing one of these buttons:
| 0.1m | minor grid represents 0.1 m, major grid represents 1 m |
| 1m | minor grid represents 1 m, major grid represents 10 m |
| 10m | minor grid represents 10 m, major grid represents 100 m |
| - | grid is hidden |
