Options/View
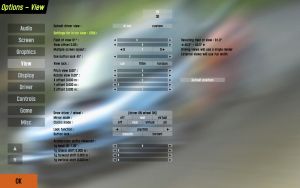
The options in the Options - View screen will adjust camera sight in the game. Making a personal preferred setting is recommended as what you see in the game is most important. Let's go through the options available from top to bottom. Note that all view options until 'Acceleration shifts viewpoint' are stored per car, allowing for maximum customizability.
- Default Driver view: In car Custom
- You can have 2 static cameras in-game, either the standard view which is the most realistic, or the custom view which can be placed anywhere. How to set up a custom view will be explained later on. Selecting one of these here will result in that being the standard view which is selected automatically when you start up LFS, at the beginning of races and can be accessed by pressing ⇧ Shift + F1. Select the view here which you will be using most of the time, in car or custom.
- Field of view:
- The width of the view you are presented in game, also known as the amount of zoom. A smaller field of view will result in a closer look at what's in front, but will show less of what's beside you which is also important. A larger field of view will result in good view around you but a distant view what's in front of you. It's up to you to define a balance here, try and adjust the slider till it comforts you. The default value is around 90°.
- View offset:
- View offset
- Multiple screen layout:
- Multiple screen layout
- One button look:
- One button look
- View lock: Car Filter Horizon
- View lock type
- Pitch view:
- The vertical direction of the camera can be selected here, it can aim upwards with a positive value, or it can aim downwards with a negative value.
- Rotate view:
- The horizontal direction of the camera. It can aim left with a negative value or aim right with a positive value.
- Move view with animation: no yes
- This option allows you to select whether the in-car camera moves along with the driver when it steers left and right, which does look realistic, but it's personal whether it should be on or off.
- The mirror offsets:
- Adjusting these will position the front mirror horizontally (mirror offset lateral) and vertically (mirror offset vertical). Make sure it's visible as it's useful tool to notice cars behind you.
- Draw driver / wheel:
- This changes what you see in the in-car view. The driver with the steering wheel, only the steering wheel, or nothing at all. Some people who use a steering wheel in LFS are known to use display no steering wheel in LFS because it looks awkward seeing a steering wheel move the same as the one you are controlling.
- Mirror mode: Off Real Virtual All
- Sets how mirrors are rendered. 'Off' disables mirrors, 'real' shows the image on the car's mirrors, 'virtual' displays a artificial mirror in the top middle of the screen and 'all' combines real and virtual mirror modes.
- Clocks mode: Off Real Virtual All
- This defines how the car's gauges and meters are displayed. 'Off' displays nothing, 'real' shows them on the car's dashboard, 'virtual' shows them on your display and 'all' shows them both on dashboard and display.
- The 'Acceleration shifts viewpoint' options:
- These options define how much the standard view and the custom view is shifted and tilted with the G forces. With all of these options set to 0, the camera remains statically at its position. As a human head and body moves along with G forces applied to it, the head and thus view moves along as well. For a realistic setting, set these options between 0 and 50% of their maximum value.
- Look function: Axis Steer MS X MS XY
- With this option, you can set up additional ways to look left and right beside the look left and right buttons. The Axis option will move the camera left and right with an axis specified in the Controls menu. Read that to get to know how to set an axis for the axis look option. The steer option will move with your steering. Steering left will result in the camera moving left as well. This can be pretty useful as when you steer left, you will want to go in that direction and a view looking into that direction shows more of what to come. The amount the camera looks into the steering direction can be adjusted with Look sensitivity. To find a good value for the sensitivity, steer all the way to one side and adjust the Look sensitivity to what is the maximum allowed amount of movement to one side. Ms X will move the camera left and right along with the mouse. Look sensitivity does the same as described above. Look centre reduction will allow you to define how easily the camera should stay in the forward looking position. Setting it at a high value will result in having to move the mouse a lot to move it out of the forward looking position. At a low value, it will move exactly like the mouse with no centre movement reduction. Ms XY does the same except the camera moves up and down with your mouse as well, making it more adjustable.
- Button look: Smooth Instant
- Setting this option will define how the camera should look left and right when you press the Look left and Look right buttons specified in the Controls menu. Smooth will pan the camera gently to the side when you press the button, instant will show you the side immediately without movement.
Setting up a custom camera
(Note: every custom camera you set up is saved per car. This way you can make a different custom camera in every car.)
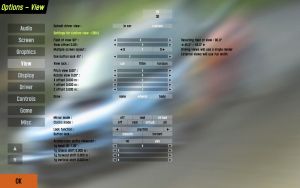
Go to the View options and click on custom in the Default driver view option. Notice that new options are available now called Settings for custom view and have changed a little.
- Draw (main): None Wheels Body
- Sets how the car around you should be drawn. 'None' means nothing is drawn, 'wheels' draws - you probably guessed it - only the wheels and 'body' draws the whole car interior.
- Acceleration shifts viewpoint: off on
- This extra option to turn off the viewpoint shifting under acceleration allows you to have a fixed camera for custom view, while still allowing a moving camera for the in-car view.
- The X offset, Y offset and Z offset:
- The most important settings of a custom view, define the custom camera's position. X offset moves the camera left and right, Y offset moves the camera forwards and backwards and Z offset moves the camera up and down. If you adjust this while the car is on track, two extra buttons will appear, namely 'Centre view' and 'Eye position'. Clicking the former will reset the offsets to 0.0, while pressing the latter will set them to the values similar to what you see in in-car view.
When you are done setting up a custom camera, click in car again in the Default driver view option if you want the default view to be used as the standard view. Though, if you are happy with the new custom view, keep it on custom so it will always be used as the primary view.
View buttons and shortcuts
See more: Keys.
V: Switches through the cameras.
⇧ Shift + V: Switches back through the cameras.
Tab ↹: Switches to the next car.
⇧ Shift + Tab ↹: Switches to the previous car.
HOME: Switches to your own car.
⇧ Shift + F1: Returns to the default view specified in the View options.
⇧ Shift + F: Removes the display showing only graphics and text messages.
⇧ Shift + M: Changes between mirror modes. (No mirrors, only real mirrors or real mirrors + a virtual mirror.)
⇧ Shift + U: Switches to the AutoX editor/Free view -mode.


