|
|
| Line 27: |
Line 27: |
| | ** [[Dashboard Editor|Dashboard (clocks)]] | | ** [[Dashboard Editor|Dashboard (clocks)]] |
| | | | |
| − | == Load vehicle == | + | == Load / Save / New vehicle == |
| | | | |
| − | Vehicle files have a .veh extension and are stored in {{folder|data|veh}} folder.
| + | * [[/Load/]] |
| − | | + | * [[/Save/]] |
| − | The LFS editor folder contains vehicle files of all [[Cars|default LFS cars]] except {{car link|BF1}}. You are free to modify the default cars as long as you [[Vehicle Mod Submission|submit them]] under the [[Vehicle Mod Licenses|LFS license]].
| + | * [[/New/]] |
| − | | |
| − | === Loading a vehicle ===
| |
| − | | |
| − | {{warning|small=yes|Loading a new vehicle will discard any unsaved changes made in an already loaded vehicle! Make sure to save the changes if needed.}}
| |
| − | | |
| − | {{steps
| |
| − | | At the bottom left, click {{old button|LOAD|#00ff00}}. A dialog "Enter name of vehicle to LOAD" will appear.
| |
| − | | Select a vehicle from the list of files.
| |
| − | | Click {{button|OK}}.
| |
| − | }}
| |
| − | | |
| − | If you want to import an external 3D model into the editor, see [[LFS Editor/Guides/Importing an external model|Importing an external 3D model]].
| |
| − | | |
| − | === Renaming a vehicle ===
| |
| − | | |
| − | {{steps
| |
| − | | At the bottom left, click {{old button|LOAD|#00ff00}}. A dialog "Enter name of vehicle to LOAD" will appear.
| |
| − | | Select a vehicle you want to rename from the list of files.
| |
| − | | Click {{button|Rename}}. The dialog title will change to "Enter new name for file".
| |
| − | | Edit the vehicle name and click {{button|OK}} or press {{key press|Enter}}.
| |
| − | }}
| |
| − | | |
| − | You can rename a vehicle file by selecting it in the Load vehicle dialog and pressing {{button|Rename}}.
| |
| − | | |
| − | === Deleting a vehicle ===
| |
| − | | |
| − | {{steps
| |
| − | | At the bottom left, click {{old button|LOAD|#00ff00}}. A dialog "Enter name of vehicle to LOAD" will appear.
| |
| − | | Select a vehicle you want to delete from the list of files.
| |
| − | | Click {{button|Delete}}. A confirmation dialog will appear.
| |
| − | | Click {{button|Yes}} to confirm the deletion.
| |
| − | }}
| |
| − | | |
| − | == Save vehicle ==
| |
| − | | |
| − | {{tip|small=yes|This will not export the vehicle to LFS. To export the vehicle for offline testing, use the {{old button|TEST mod in LFS|#a1fafa}} button at the top right.}}
| |
| − | | |
| − | To save changes made to a vehicle into a .veh file, click the {{old button|SAVE|#00ff00}} button at the bottom left.
| |
| − | | |
| − | == New vehicle ==
| |
| − | | |
| − | {{Under construction}}
| |
| − | | |
| − | [[Image:LFS Editor - vehicle layout selection.jpg|thumb]] | |
| − | [[Image:LFS Editor - new car.jpg|thumb|Initial setup for new vehicle - car]]
| |
| | | | |
| | [[Category:LFS Editor]] | | [[Category:LFS Editor]] |
Vehicle Editor is a part of the LFS Editor, a program to create vehicle mods. The vehicle editor uses the 3D model made in Modeller and adds wheels, suspension, engine, lights, dashboard, mass distribution and more.
Starting the editor
First, follow the instructions how to download and install the LFS Editor.
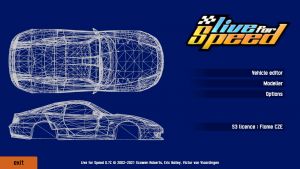
Once you have the editor installed and run LFS_EDITOR.exe, you will be presented with an entry screen. Click the Vehicle editor button to enter the vehicle editor. You will be presented with an empty editor with no vehicle loaded.
Editor modes
Load / Save / New vehicle
