Difference between revisions of "LFS Editor/Modeller/Texture Cutout Mode"
From LFS Manual
< LFS Editor | Modeller
Jump to navigationJump to searchm |
m |
||
| (6 intermediate revisions by the same user not shown) | |||
| Line 1: | Line 1: | ||
| − | |||
{{Infobox LFS Editor}} | {{Infobox LFS Editor}} | ||
| Line 17: | Line 16: | ||
* A [[../Texture Page Mode|page]] can be divided into one or more cutouts. | * A [[../Texture Page Mode|page]] can be divided into one or more cutouts. | ||
* A cutout can be assigned to one or more [[../Texture Mapping Mode|mappings]]. | * A cutout can be assigned to one or more [[../Texture Mapping Mode|mappings]]. | ||
| + | |||
| + | == List of cutouts == | ||
| + | |||
| + | On the left side, there is a list of all texture cutouts created for the currently selected object: | ||
| + | |||
| + | [[Image:LFS Editor modeller list of cutouts.jpg|thumb|none|List of cutouts in cutout mode]] | ||
| + | |||
| + | The table is divided into several parts (from left to right): cutout name, texture page and material properties. | ||
| + | |||
| + | Take the first row as an example: | ||
| + | |||
| + | {{old button|SIDE_R}}{{old button|RB4_DEFAULT|#959595}}{{old button|SOLID|#a1a1ff}}{{old button|C SHINE|#a1a1ff}}{{old button|0}}{{old button|PAINT|#ffffff}}{{old button|1}}{{old button|S|#959595}} | ||
| + | |||
| + | {| class="wikitable" | ||
| + | ! width="130px" | Table cell example | ||
| + | ! width="400px" | Description | ||
| + | |- | ||
| + | | align="center" | {{old button|SIDE_R}} | ||
| + | | Cutout name - click to select the cutout, right click to rename it | ||
| + | |- | ||
| + | | align="center" | {{old button|RB4_DEFAULT|#959595}} | ||
| + | | Texture page used by this cutout | ||
| + | |- | ||
| + | | align="center" | {{old button|SOLID|#a1a1ff}} | ||
| + | | Material transparency | ||
| + | |- | ||
| + | | align="center" | {{old button|C SHINE|#a1a1ff}} | ||
| + | | Material reflection type | ||
| + | |- | ||
| + | | align="center" | {{old button|0}} | ||
| + | | Material reflection roughness | ||
| + | |- | ||
| + | | align="center" | {{old button|PAINT|#ffffff}} | ||
| + | | Material shine type | ||
| + | |- | ||
| + | | align="center" | {{old button|1}} | ||
| + | | Index number of this material | ||
| + | |- | ||
| + | | align="center" | {{old button|S|#959595}} | ||
| + | | Multiple selection - click or {{key press|Shift|LMB}} to select multiple cutouts | ||
| + | |} | ||
| + | |||
| + | == Adding a new cutout == | ||
| + | |||
| + | Below the list of cutouts, click {{old button|add new cutout|#a1ffa1}} or press {{key press|Ctrl|N}} and enter a name for the cutout. | ||
[[Category:Modeller|{{SUBPAGENAME}}]] | [[Category:Modeller|{{SUBPAGENAME}}]] | ||
Latest revision as of 09:30, 4 September 2024
| LFS Editor | |
|---|---|
|
|
| Vehicle Mods |
Texture cutout mode (or cutout mode) is an editing mode in the modeller, a part of the LFS Editor. In this mode, you define areas of texture pages which can be assigned to different mappings in map mode.
Entering the cutout mode
- 1 Open the modeller.
- 2 Click the cutout button at the top left or press 6.
Relation to pages and mappings
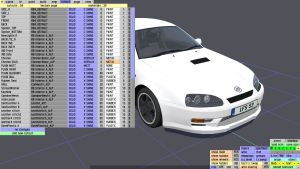
List of cutouts
On the left side, there is a list of all texture cutouts created for the currently selected object:
The table is divided into several parts (from left to right): cutout name, texture page and material properties.
Take the first row as an example:
SIDE_RRB4_DEFAULTSOLIDC SHINE0PAINT1S
| Table cell example | Description |
|---|---|
| SIDE_R | Cutout name - click to select the cutout, right click to rename it |
| RB4_DEFAULT | Texture page used by this cutout |
| SOLID | Material transparency |
| C SHINE | Material reflection type |
| 0 | Material reflection roughness |
| PAINT | Material shine type |
| 1 | Index number of this material |
| S | Multiple selection - click or ⇧ Shift + LMB to select multiple cutouts |
Adding a new cutout
Below the list of cutouts, click add new cutout or press Ctrl + N and enter a name for the cutout.

