Difference between revisions of "LFS Editor/Guides/Partial Symmetry"
Bokujishin (talk | contribs) (Created page with "While many cars are mostly symmetrical, there are some details that are found specifically on one side - a prime example being the fuel door. It is possible to keep the car sy...") |
Bokujishin (talk | contribs) m |
||
| (3 intermediate revisions by the same user not shown) | |||
| Line 1: | Line 1: | ||
| + | {{Infobox LFS Editor}} | ||
| + | |||
While many cars are mostly symmetrical, there are some details that are found specifically on one side - a prime example being the fuel door. It is possible to keep the car symmetrical, but separate only the area around the fuel door, while keeping the entire mesh attached properly, including smoothing groups. | While many cars are mostly symmetrical, there are some details that are found specifically on one side - a prime example being the fuel door. It is possible to keep the car symmetrical, but separate only the area around the fuel door, while keeping the entire mesh attached properly, including smoothing groups. | ||
| Line 5: | Line 7: | ||
{{steps | {{steps | ||
|Open your mesh, remove the symmetrical area from one side if not done already: you should have a complete side and just the non-symmetrical part on the other side. | |Open your mesh, remove the symmetrical area from one side if not done already: you should have a complete side and just the non-symmetrical part on the other side. | ||
| − | <p>[[File:Partial_symmetry_01.jpg|400px|Right side with fuel door]][[File: | + | <p>[[File:Partial_symmetry_01.jpg|400px|Right side with fuel door]][[File:Partial symmetry 02.jpg|400px|Left side with only the area corresponding to the fuel door]]</p> |
| − | |Select the isolated part, press {{key press|S}} or click {{old button|select selection's points| | + | |Select the isolated part's triangles, press {{key press|S}} or click {{old button|select selection's points|lightgrey}}, then click {{old button|flip:|lightgrey}}{{old button|L-R|paleviolet}} to move the isolated part to the main side. |
| − | |Press {{key press|S}} again or click {{old button|select connected triangles| | + | |Press {{key press|S}} again or click {{old button|select connected triangles|lightgrey}} to go back to the triangles. |
| − | |During the flip, the geometry will likely get inverted normals, {{old button|flip tris| | + | |During the flip, the geometry will likely get inverted normals, {{old button|flip tris|lightgrey}} if needed to fix them. |
| − | |Click {{old button|build unmirrored| | + | |Click {{old button|build unmirrored|paleviolet}}, a copy of the geometry is now back to the correct side, but built on reflected points. |
|Delete the triangles that were used to build the unmirrored version, you can easily select them by pressing {{key press|S}} twice right after the unmirrored copy as they are still linked through the reflected points. | |Delete the triangles that were used to build the unmirrored version, you can easily select them by pressing {{key press|S}} twice right after the unmirrored copy as they are still linked through the reflected points. | ||
| − | |Select all the points at the boundary, then click {{old button|merge| | + | |Select all the points at the boundary, then click {{old button|merge|lightgrey}}, then merge by specified distance, adjust the tolerance as needed (a very small value should be fine as the points are coincident). This will ensure the isolated triangles on the opposite side are attached to the mirrored geometry. |
|Adjust smoothing groups as needed, there should be no change of smoothing group over the boundary. | |Adjust smoothing groups as needed, there should be no change of smoothing group over the boundary. | ||
}} | }} | ||
You now have partially symmetric geometry, all properly attached and with smooth normals and reflections. You can use this technique for other parts as well: exhaust pipe opening in the bumper, cutaway on one side of the hood, tow hook covers, etc. | You now have partially symmetric geometry, all properly attached and with smooth normals and reflections. You can use this technique for other parts as well: exhaust pipe opening in the bumper, cutaway on one side of the hood, tow hook covers, etc. | ||
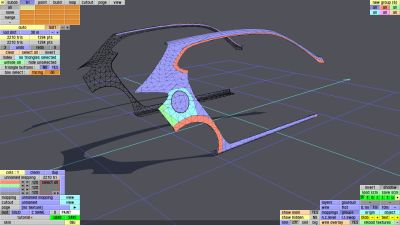
| − | [[File: | + | [[File:Partial symmetry 03.jpg|600px|Selection with partial symmetry]] |
{{tip|The merged points are also useful without reflected geometry, if you are using [[LFS Editor/Guides/Car Configurations|multiple car configurations]].}} | {{tip|The merged points are also useful without reflected geometry, if you are using [[LFS Editor/Guides/Car Configurations|multiple car configurations]].}} | ||
| + | |||
| + | [[Category:LFS Editor Guides|{{SUBPAGENAME}}]] | ||
Latest revision as of 16:52, 28 January 2025
| LFS Editor | |
|---|---|
|
|
| Vehicle Mods |
While many cars are mostly symmetrical, there are some details that are found specifically on one side - a prime example being the fuel door. It is possible to keep the car symmetrical, but separate only the area around the fuel door, while keeping the entire mesh attached properly, including smoothing groups.
To do this, you need to make sure that your mesh is symmetrical up to the boundaries of the non-symmetrical area. You can model both variants (e.g. with and without fuel door) in the same spot or on their respective sides, in which case we will need to flip one side.
- 1Open your mesh, remove the symmetrical area from one side if not done already: you should have a complete side and just the non-symmetrical part on the other side.
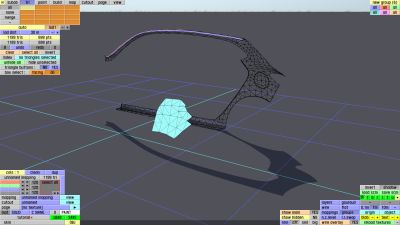
- 2Select the isolated part's triangles, press S or click select selection's points, then click flip:L-R to move the isolated part to the main side.
- 3Press S again or click select connected triangles to go back to the triangles.
- 4During the flip, the geometry will likely get inverted normals, flip tris if needed to fix them.
- 5Click build unmirrored, a copy of the geometry is now back to the correct side, but built on reflected points.
- 6Delete the triangles that were used to build the unmirrored version, you can easily select them by pressing S twice right after the unmirrored copy as they are still linked through the reflected points.
- 7Select all the points at the boundary, then click merge, then merge by specified distance, adjust the tolerance as needed (a very small value should be fine as the points are coincident). This will ensure the isolated triangles on the opposite side are attached to the mirrored geometry.
- 8Adjust smoothing groups as needed, there should be no change of smoothing group over the boundary.


You now have partially symmetric geometry, all properly attached and with smooth normals and reflections. You can use this technique for other parts as well: exhaust pipe opening in the bumper, cutaway on one side of the hood, tow hook covers, etc.

| The merged points are also useful without reflected geometry, if you are using multiple car configurations. |