LFS Editor/Guides/Rotating a Model
From LFS Manual
< LFS Editor | Guides
Jump to navigationJump to search| LFS Editor | |
|---|---|
|
|
| Vehicle Mods |
This is a guide how to rotate a model in the modeller.
Suppose you have imported a 3D model which faces the wrong direction:

| If you have imported an external 3D model and it appears wrongly rotated in LFS Editor, you should re-export it from a 3D editor with the correct export settings. See Importing an external model - Export Settings. |
Rotating a model by a set number of degrees around a point
- 1 In the modeller, switch to point mode by clicking point at the top left of the screen or by pressing 3.
- 2 Switch to a 2D view depending on which axis you want to rotate the model around. For example, to rotate the model around the X axis, switch to the right side 2D view by clicking the R button at the bottom right or by pressing R.
- 3 Select a point around which the rotation will be done by clicking it with LMB.
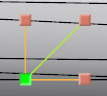
- 4 Select all points by pressing Ctrl + A. The selected pivot point will remain green and all other points will be red.
- 5 Click the rotate button in the left panel. A dialog will appear.
- 6 Enter the desired number of degrees to rotate anti-clockwise around the green point and click OK press ↵ Enter. In this example, the correct rotation is 90.
- 7 Move the model so it fits in between the wheels. One way to move the model is to drag one of the move buttons going from the green point.


This is the final result:
