LFS Editor/Guides/Dashboard
| LFS Editor | |
|---|---|
|
|
| Vehicle Mods |
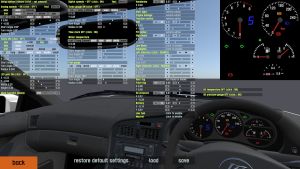
You can edit the positions of various parts of the car dashboard or switch some gauges or lights on or off in the dashboard editor.
Choosing the dashboard type
- 1 Open the Vehicle Editor.
- 2 In the top left corner, click the Textures button.
- 3 In the top left corner, click the s_clock button to select the dashboard type.
This strange looking name, e.g. s_clock_formula is actually a specially named live texture that you can enter in page mode in the Modeller, as a texture page either for the main object or a subobject.
Entering the dashboard editor
- 1 Open the Vehicle Editor.
- 2 In the top left corner, click the Textures button.
- 3 In the top left corner, click the EDIT button next to CLOCKSs_clock.
It is a good idea to switch off any lights or gauges you don't need.
Custom dashboard backing texture
There is an option to create a custom dashboard backing texture for the clocks. The backing texture appears behind the needle, numbers and markings. It appears illuminated (self lit) like the default dashboards. The recommended texture size is 512 or 1024 for future-proofing.
- 1 Open the Modeller.
- 2 Make sure you have the main object selected in subobject mode.
- 3 Go to the page mode by clicking the page button or pressing 7.
- 4 Click add new page and load the backing texture.
- 5 Click the fixed button to mark it as "dash".
Now when you enter the dashboard editor, the custom backing texture will appear underneath your clocks.
